Hello there, it’s been a while.
Didn’t really have a topic to write about, but today I have something a bit more fancy… at least for me.
In this post, I want to go through a simple deployment of a Ceph Cluster using 3 VMs. I will go through the steps to bootstrap the cluster using “cephadm” adding a couple of nodes and creating our first CephFS filesystem.
The last step will be to mount the filesystem on a client and create a few files.
So, what is Ceph you might ask? Ceph is an open-source software-defined storage platform. This allows you to span your storage system over multiple servers, which makes scaling out your storage (somewhat) easy. It provides object, block and file storage options, giving you a huge amount of flexibility.
Now, I am writing all this, but this will be the first time deploying Ceph myself. 🙂
All of this, you can also get from the official documentation. I’m just making it a bit more compact.
Let’s begin.
Ceph Installation/Deployment
For this I am assuming that you have 3 hosts deployed with at least one 10GB disk attached. You can add more disks or use physical servers, I just don’t have the resources. The steps will be the same. Also, I will be using “Rocky Linux 9 Generic Cloud” VMs, so no firewall in my case.
Here is my setup.
| Hostname | Network | disk |
| ceph-01 | 10.10.0.31/24 | 3x 10GB |
| ceph-02 | 10.10.0.32/24 | 3x 10GB |
| ceph-03 | 10.10.0.33/24 | 3x 10GB |
Installation of the required packages
First things first. We have to install the required packages. Do this on every host.
This will install additional packages like podman and lvm.
ceph-01
# Install the repository
ceph-01 :: ~ » sudo dnf install centos-release-ceph-reef
# Install the cephadm package
ceph-01 :: ~ » sudo dnf install cephadm
# Install podman
ceph-01 :: ~ » sudo dnf install podman
# Not required but recommended are the ceph tools (optional)
ceph-01 :: ~ » sudo dnf install ceph-common
ceph-02
# Install the repository
ceph-02 :: ~ » sudo dnf install centos-release-ceph-reef
# Install the cephadm package
ceph-02 :: ~ » sudo dnf install cephadm
# Install podman
ceph-02 :: ~ » sudo dnf install podman
# Not required but recommended are the ceph tools (optional)
ceph-02 :: ~ » sudo dnf install ceph-common
ceph-03
# Install the repository
ceph-03 :: ~ » sudo dnf install centos-release-ceph-reef
# Install the cephadm package
ceph-03 :: ~ » sudo dnf install cephadm
# Install podman
ceph-03 :: ~ » sudo dnf install podman
# Not required but recommended are the ceph tools (optional)
ceph-03 :: ~ » sudo dnf install ceph-common
Setting up the firewall
Next, we need to set up the firewall. Either disable it or better yet, open the following ports on the servers.
ceph-01 :: ~ » sudo firewall-cmd --add-port={8443,3000,9095,9093,9094,9100,9283}/tcp
Bootstrap the ceph cluster
Now we can bootstrap our cluster. We only need to do this on one system. Enter the IP of the host you are trying to bootstrap.
This will show a bunch of things, the interesting ones are the “Ceph Dashboard” credentials. This is the integrated web interface for ceph. It basically allows you to manage your ceph cluster using a GUI interface, but we will be using the CLI for this.
ceph-01
# Bootstrap ceph cluster
ceph-01 :: ~ » sudo cephadm bootstrap --mon-ip 10.10.0.31
...
Ceph Dashboard is now available at:

             URL: https://ceph-01:8443/
            User: admin
        Password: 6t6bp4ueg6
...
Add additional Hosts
Next, we can add the other two hosts to the cluster.
But first we have to add the SSH public keys to the two additional hosts. How you do this, is up to you, I will just copy / paste the key into the root “authorized_keys” file. If you already have SSH configured, you could use the “ssh-copy-id” command.
The public key is located at /etc/ceph/ceph.pub
Here the method using ssh-copy-id
# Switch to root
ceph-01 :: ~ » sudo -s
# Copy the public key to remote host
ceph-01 :: root » ssh-copy-id -f -i /etc/ceph/ceph.pub root@*<new-host>*
You could also just manually add it. For this, copy the key.
# Output and copy the key
ceph-01 :: ~ » cat /etc/ceph/ceph.pub
ssh-rsa AAAAB3NzaC1yc2EAAAADAQABAAABgQDKU8XD6xkuqKE8suXP3AhXppGuUVHrFZDR5LQsDbnX9WBfGeqrU/1sstqif3nTcbfnXXGZXbH8HYR9lefIJnDsoJRUgwzInZCm2IvGFa+ZKCJV3ADnf4bFZDQn7x4svBGQylMQlMPZup2MLLLbD4yHXCTil1Ah+X3irdMvPZN4rGz1rrj1BNehQ2ihDwD0yY3+qLzzVra6lNkdWW0= ceph-267b2084-e0ac-11ee-9381-52540074873a
And just paste it into the root authorized_key file.
# Switch to root
ceph-02 :: ~ » sudo -s
# Paste the key into the autorized_keys file
ceph-02 :: root » vim ~/.ssh/authorized_keys
Once that’s done, we can add the nodes to the cluster. This will deploy and configure ceph on the other hosts automatically.
# Add the nodes to the cluster
ceph-01 :: ~ » ceph orch host add ceph-02 10.10.0.32
ceph-01 :: ~ » ceph orch host add ceph-03 10.10.0.33
With the command “ceph status”, we can check the status of the cluster. The green marked line shows our nodes. We also have an error seen in the red line. This is because we didn’t add any OSDs yet. This is basically our storage. There will be one OSD per physical disk.
ceph-01 :: ~ » ceph status
  cluster:
    id:     f581d60e-e2f8-11ee-8f4b-525400c55f38
    health: HEALTH_WARN
            OSD count 0 < osd_pool_default_size 3

  services:
    mon: 3 daemons, quorum ceph-01,ceph-02,ceph-03 (age 20s)
    mgr: ceph-01.bhovln(active, since 10m), standbys: ceph-02.tzstuj
    osd: 0 osds: 0 up, 0 in

  data:
    pools:   0 pools, 0 pgs
    objects: 0 objects, 0 B
    usage:   0 B used, 0 B / 0 B avail
    pgs:
Add OSD to cluster
With the following command, we can add all unused and available storage.
ceph-01 :: ~ » ceph orch apply osd --all-available-devices
If you want to add a single disk, use this command.
ceph-01 :: ~ » ceph orch daemon add osd <hostname>:/dev/vdb
If you want to check what happens first, execute the command with the “–dry-run” option. You have to execute this twice (you will get a message telling you to try again in a bit.
ceph-01 :: ~ » ceph orch apply osd --all-available-devices --dry-run
+---------+-----------------------+---------+----------+----+-----+
|SERVICE  |NAME                   |HOST     |DATA      |DB  |WAL  |
+---------+-----------------------+---------+----------+----+-----+
|osd      |all-available-devices  |ceph-01  |/dev/vdb  |-   |-    |
|osd      |all-available-devices  |ceph-01  |/dev/vdc  |-   |-    |
|osd      |all-available-devices  |ceph-01  |/dev/vdd  |-   |-    |
|osd      |all-available-devices  |ceph-02  |/dev/vdb  |-   |-    |
|osd      |all-available-devices  |ceph-02  |/dev/vdc  |-   |-    |
|osd      |all-available-devices  |ceph-02  |/dev/vdd  |-   |-    |
|osd      |all-available-devices  |ceph-03  |/dev/vdb  |-   |-    |
|osd      |all-available-devices  |ceph-03  |/dev/vdc  |-   |-    |
|osd      |all-available-devices  |ceph-03  |/dev/vdd  |-   |-    |
+---------+-----------------------+---------+----------+----+-----+
Once added, you can check the disks with this command.
ceph-01 :: ~ » ceph orch device ls
HOST     PATH      TYPE  DEVICE ID   SIZE  AVAILABLE  REFRESHED  REJECT REASONS
ceph-01  /dev/vdb  hdd              10.0G  Yes        16m ago
ceph-01  /dev/vdc  hdd              10.0G  Yes        16m ago
ceph-01  /dev/vdd  hdd              10.0G  Yes        16m ago
ceph-02  /dev/vdb  hdd              10.0G  Yes        16m ago
ceph-02  /dev/vdc  hdd              10.0G  Yes        16m ago
ceph-02  /dev/vdd  hdd              10.0G  Yes        16m ago
ceph-03  /dev/vdb  hdd              10.0G  Yes        15m ago
ceph-03  /dev/vdc  hdd              10.0G  Yes        15m ago
ceph-03  /dev/vdd  hdd              10.0G  Yes        15m ago
Great. Let’s check the health again.
ceph-01 :: ~ » ceph status
  cluster:
    id:     f581d60e-e2f8-11ee-8f4b-525400c55f38
    health: HEALTH_OK

  services:
    mon: 3 daemons, quorum ceph-01,ceph-02,ceph-03 (age 17m)
    mgr: ceph-01.bhovln(active, since 27m), standbys: ceph-02.tzstuj
    osd: 9 osds: 9 up (since 14s), 9 in (since 2m)

  data:
    pools:   1 pools, 1 pgs
    objects: 2 objects, 449 KiB
    usage:   640 MiB used, 89 GiB / 90 GiB avail
    pgs:     1 active+clean

  io:
    recovery: 43 KiB/s, 0 objects/s
Ok. That’s it. We have a running cluster. It’s not doing much right now though, let’s change that.
Ceph Configuration
Create a CephFS
Alright. Since we want to actually access the storage somehow, we need a system that allows us to connect. For this, we will first create a Ceph filesystem.
This command will also create two pools. One for the metadata and one for actual files.
The default for the replicas is 3, meaning that we get 2 copies for every file we create. It’s a bit more complex than that, but I think that explains it simply enough. We could lose 2 nodes without data loss, but the cluster would be in a degraded state.
ceph-01 :: ~ » ceph fs volume create CEPH-FS-01
Let’s check if it has been created.
ceph-01 :: ~ » ceph fs ls
name: CEPH-FS-01, metadata pool: cephfs.CEPH-FS-01.meta, data pools: [cephfs.CEPH-FS-01.data ]
Change replication size
Like I said earlier, the default for the replications is 3. If you want to change that, use the following command.
ceph-01 :: ~ » ceph osd pool set cephfs.CEPH-FS-01.meta size 2
We can also change the minimum before the cluster stops IO completely.
fedora :: ~ » ceph osd pool set cephfs.CEPH-FS-01.meta min_size 1
Keep in mind, that this is not recommended.
Mount the CephFS
Generate minimal config
Ok. Now let’s see if we can mount the filesystem. I will use a “client” Fedora 39 system for this. But first, we need to create a minimal configuration for the client. Execute this on the ceph cluster host and copy the output.
ceph-01 :: ~ » ceph config generate-minimal-conf
# minimal ceph.conf for f581d60e-e2f8-11ee-8f4b-525400c55f38
[global]
        fsid = f581d60e-e2f8-11ee-8f4b-525400c55f38
        mon_host = [v2:10.10.0.31:3300/0,v1:10.10.0.31:6789/0] [v2:10.10.0.32:3300/0,v1:10.10.0.32:6789/0] [v2:10.10.0.33:3300/0,v1:10.10.0.33:6789/0]
Next, we switch to the client. Install the “ceph-common” package.
fedora :: ~ » sudo dnf install ceph-common
Now we need to paste the minimal config to /etc/ceph/ceph.conf.
fedora :: ~ » sudo vim /etc/ceph/ceph.conf
# minimal ceph.conf for f581d60e-e2f8-11ee-8f4b-525400c55f38
[global]
        fsid = f581d60e-e2f8-11ee-8f4b-525400c55f38
        mon_host = [v2:10.10.0.31:3300/0,v1:10.10.0.31:6789/0] [v2:10.10.0.32:3300/0,v1:10.10.0.32:6789/0] [v2:10.10.0.33:3300/0,v1:10.10.0.33:6789/0]
Create user
Ok. Back to the server. We need to create a user. Use the following command.
# Syntax
ceph-01 :: ~ » ceph fs authorize <filesystem-name> client.<username> / rw
# Example
ceph-01 :: ~ » ceph fs authorize CEPH-FS-01 client.bob / rw
[client.bob]
        key = AQACoPRl/ihvNBAAqBkigFRlb7A6zs8XlaT2hg==
Again, copy the output and enter it into the /etc/ceph/ceph.client.bob.keyring.
fedora :: ~ » sudo vim /etc/ceph/ceph.client.bob.keyring
[client.bob]
        key = AQACoPRl/ihvNBAAqBkigFRlb7A6zs8XlaT2hg==
Change the permission.
fedora :: ~ » sudo chmod 644 /etc/ceph/ceph.conf
fedora :: ~ » sudo chmod 600 /etc/ceph/ceph.client.bob.keyring
Mounting the Ceph Filesystem
Alright. One more step and we can mount the filesystem.
We need the fsid from the ceph cluster. For this execute the following command.
ceph-01 :: ~ » ceph fsid
f581d60e-e2f8-11ee-8f4b-525400c55f38
Now we can mount the filesystem on the client. Create a folder for the mount point and execute the mount command with the following parameters.
## Create a folder for the mountpoint
fedora :: ~ » sudo mkdir /mnt/CEPH
## Mount the filesystem
# Syntax
fedora :: ~ » sudo mount -t ceph <username>@<fsid>.<filesystem-name>=/ <mountpoint>
# Example
fedora :: ~ » sudo mount -t ceph user@f581d60e-e2f8-11ee-8f4b-525400c55f38.CEPH-FS-01=/ /mnt/CEPH/
Fantastic. It should be mounted. Let’s check.
fedora :: ~ » mount
...
user@f581d60e-e2f8-11ee-8f4b-525400c55f38.CEPH-FS-01=/ on /mnt/CEPH type ceph (rw,relatime,seclabel,name=user,secret=<hidden>,ms_mode=prefer-crc,acl,mon_addr=10.10.0.31:3300/10.10.0.32:3300/10.10.0.33:3300)
Actually. Since we only have one fsid entry in the ceph.conf file on the client, we could also just type this without the fsid.
fedora :: ~ » sudo mount -t ceph user@.CEPH-FS-01=/ /mnt/CEPH/
Testing the filesystem
Ok. I want to check the used space on the OSDs.
ceph-01 :: ~ » ceph osd status
 0  ceph-03  48.6M  9.94G      0        0       0        0   exists,up
 1  ceph-02  44.6M  9.95G      0        0       0        0   exists,up
 2  ceph-01  27.0M  9.96G      0        0       0        0   exists,up
 3  ceph-03  27.4M  9.96G      0        0       0        0   exists,up
 4  ceph-02  48.6M  9.94G      0        0       0        0   exists,up
 5  ceph-01  49.1M  9.94G      0        0       0        0   exists,up
 6  ceph-03  27.0M  9.96G      0        0       0        0   exists,up
 7  ceph-02  27.4M  9.96G      0        0       0        0   exists,up
 8  ceph-01  27.0M  9.96G      0        0       0        0   exists,up
Around 30MB. Alright, let’s create and copy a few files onto the CephFS from the client.
fedora :: ~ » dd if=/dev/zero of=/mnt/CEPH/testfile bs=100M count=1
Again. Let’s check the OSDs.
ceph-01 :: ~ » ceph osd status
ID  HOST      USED  AVAIL  WR OPS  WR DATA  RD OPS  RD DATA  STATE
 0  ceph-03  92.6M  9.90G      0        0       0        0   exists,up
 1  ceph-02  84.6M  9.91G      0        0       0        0   exists,up
 2  ceph-01  92.6M  9.90G      0        0       0        0   exists,up
 3  ceph-03  59.4M  9.93G      0        0       0        0   exists,up
 4  ceph-02  72.6M  9.92G      0        0       0        0   exists,up
 5  ceph-01  73.1M  9.92G      0        0       0        0   exists,up
 6  ceph-03  51.0M  9.94G      0        0       0        0   exists,up
 7  ceph-02  63.4M  9.93G      0        0       0        0   exists,up
 8  ceph-01  55.0M  9.94G      0        0       0        0   exists,up
It looks like, it distributed it nicely.
Adding additional managers
Ok. One more thing before I want to take a quick peek at the dashboard. We currently only have 2 managers in our 3 node cluster, and I would like to change that. I want to define a minimum of 3 managers in my cluster. For this, we will use the following command.
ceph-01 :: ~ » ceph orch apply mgr 3
Scheduled mgr update...
Once that’s done, doing its thing, we should see the mgr count go up. Having one active and two standbys.
ceph-01 :: ~ » ceph status
  cluster:
    id:     f581d60e-e2f8-11ee-8f4b-525400c55f38
    health: HEALTH_OK

  services:
    mon: 3 daemons, quorum ceph-01,ceph-02,ceph-03 (age 75m)
    mgr: ceph-01.bhovln(active, since 86m), standbys: ceph-02.tzstuj, ceph-03.rfjafn
    mds: 1/1 daemons up, 1 standby
    osd: 9 osds: 9 up (since 58m), 9 in (since 61m)

  data:
    volumes: 1/1 healthy
    pools:   3 pools, 273 pgs
    objects: 50 objects, 100 MiB
    usage:   649 MiB used, 89 GiB / 90 GiB avail
    pgs:     273 active+clean
Great.
Ceph Dashboard
Now I want to take a quick look at the Ceph Dashboard. Remember the output with the URL from the beginning. Paste that into a browser (https://10.10.0.31:8443) and you will get to the login screen. Log in with the auto-generated credentials, next it will ask you to change your password.

Once we are in, we can see all the options we have on the left. With the “Expand Cluster” button, we could add additional servers to our cluster.
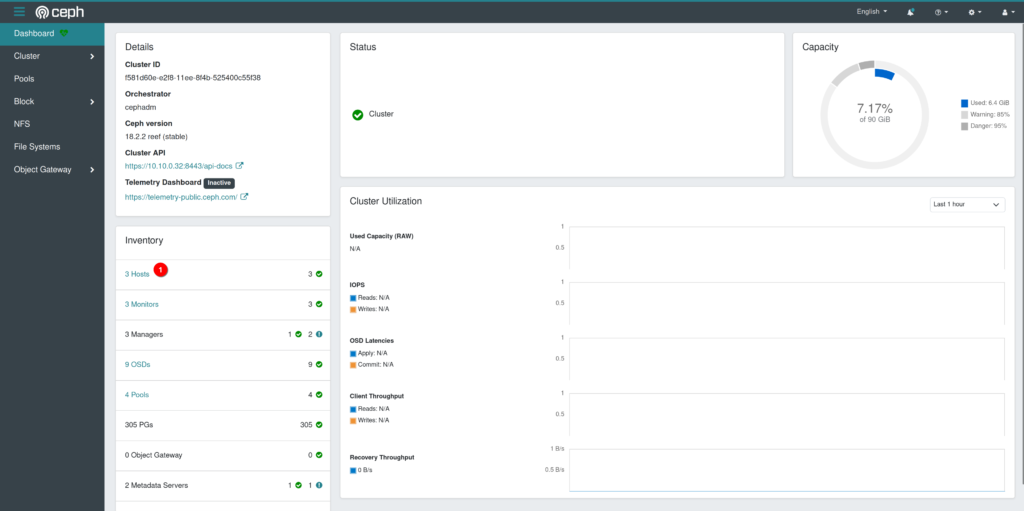
Click on “Dashboard” and we get an overview of the current health of our cluster. The “Inventory”, used capacity, Cluster Utilization and so on.
Select the “Hosts”.
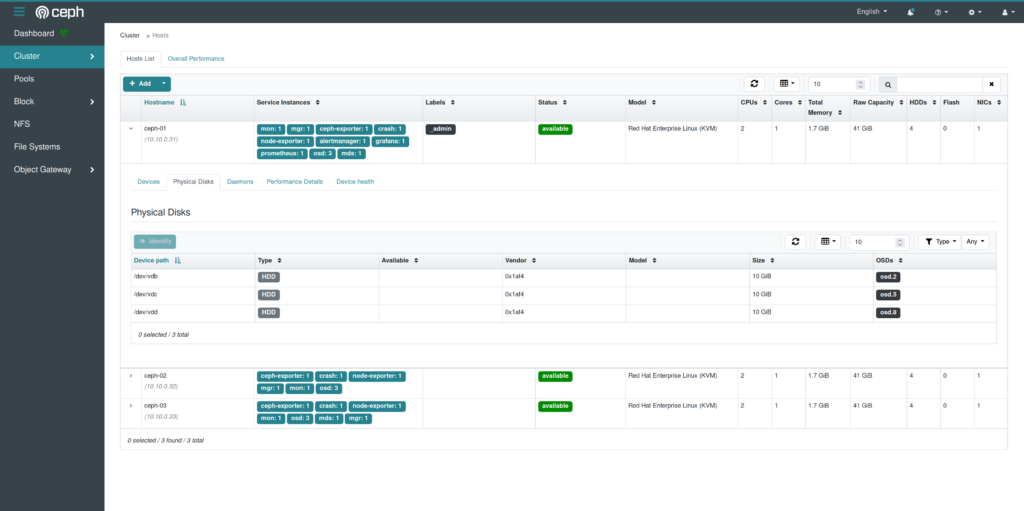
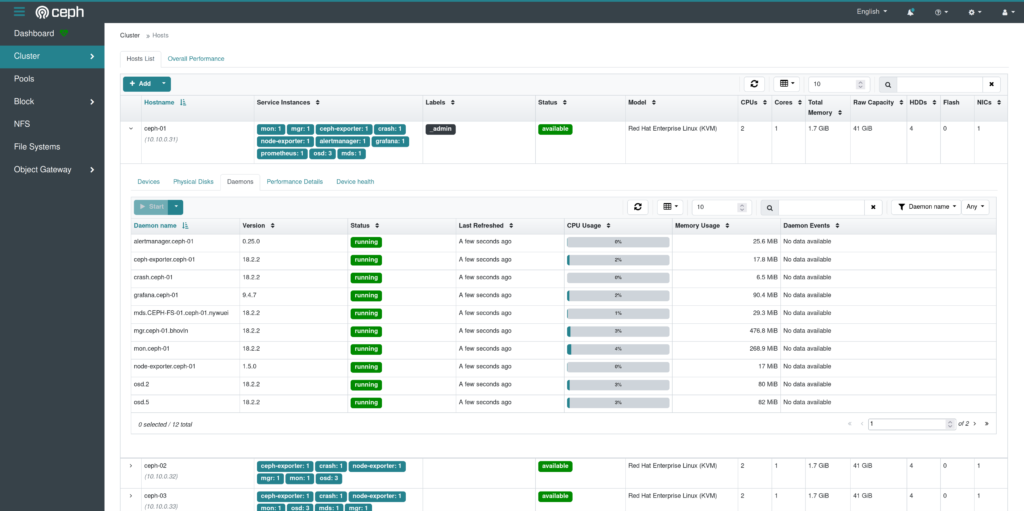
I have expanded the first host, so we can take a look at the information provided. We can see the list of physical disks in the server and the assigned osd, the daemons that are running on that host and so on. Here we could also add additional hosts to our cluster.
One last tab, the “File Systems”. Here we can see the pools that the filesystem belongs to, we can create subvolumes, check the connected clients and browse the directories.
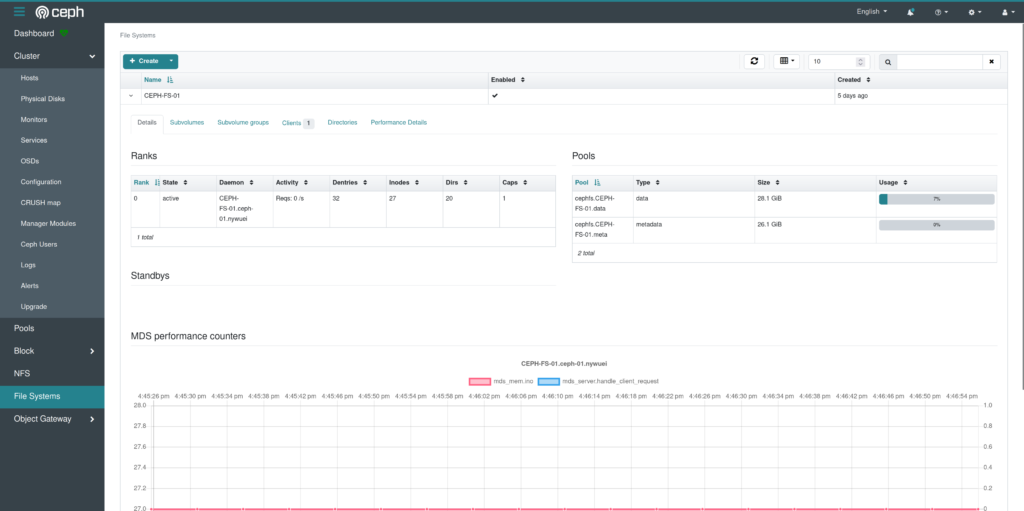
The Dashboard looks overall very powerful.
Alright. That is it for today. I will keep poking at ceph for a while, looks fun but my tiny NUC seems a bit overwhelmed by ceph and keeps freezing up. But I haven’t lost any data yet. 🙂
Till next time.
show de bola
Hi Paulo,
Thank you. 🙂
vamos pra cima
Hello. How you solve this problem:
“`# dnf install ceph-common
Last metadata expiration check: 0:01:26 ago on Thu 07 Aug 2025 07:12:34 PM MSK.
Error:
Problem: cannot install the best candidate for the job
– nothing provides libcrypto.so.3(OPENSSL_3.4.0)(64bit) needed by ceph-common-2:19.2.3-1.el9s.x86_64 from centos-ceph-squid
(try to add ‘–skip-broken’ to skip uninstallable packages or ‘–nobest’ to use not only best candidate packages)“`
Hi,
i would need a bit more information. Did you try this on Rocky Linux 9 and did you install the required repository “centos-release-ceph-reef”?
I will have to try and replicate this, since it’s been a while. Maybe something changed in the Rocky Linux repository.
Hi Gokhan
Please Make a FC based HPE Alletra configuration Also Make a AI LAB configuration in Cluster mode with 2 Node on Rocky Linux
Hi Amit,
Unfortunately, I am not working for an IT service providers anymore, so won’t have an opportunity any time soon to get my hands on an HPE Alletra.
I will take a look at a cluster configuration for AI. But this will take a bit, since I currently lack the hardware.
Thank you for the comment.
Best regards.