Hello everyone.
Today I got to play with something very special. A Nimble… I mean Alletra 5000 with 25GbE iSCSI. It’s basically a HPE Nimble with a forced cloud connection. So we needed a new name, I guess.
Setting this thing up was a pain. Just to enable the local WebUI took around an hour. One of the reasons for that, is the “ultra fast” website HPE has. I don’t know why it’s soooo slow. Nonetheless, after finally setting everything up and gaining access to the local web interface, I had the opportunity to play with it. As we’re currently exploring alternatives to VMware vSphere, I’ll be configuring it with Proxmox instead of ESXi.
This won’t be a deep dive, and most definitely not a guide on deploying Proxmox with a shared storage system. This is just for fun and all of the systems I am demonstrating are in our test environment and will never be used in production.
So around the same time I started playing with the storage, I also began looking into Proxmox. I have no experience with either of these systems, so if any of the stuff I am showing seem questionable, please feel free to point them out. I know that the shared storage solution I am showing here, is not supported. But it works.
Also, I won’t be able to show you the setup from start to finish unfortunately, but in case you care, I am using the following setup for this.
A HPE ProLiant DL380 Gen8 and a Lenovo SR650 for the Proxmox servers and the HPE Alletra that has been registered and is accessible through the webui.
The Proxmox servers are mostly in their base configuration. I did create a 2 node cluster without a witness though.
| Hostname | IP-Address | Function |
| Proxmox-01 | 192.168.152.15/24 | MGMT/DATA |
| Proxmox-02 | 192.168.152.16/24 | MGMT/DATA |
| HPE-ALLETRA | 192.168.152.31/24 | DATA (iSCSI) |
| 172.16.10.25/16 | MGMT |
Alright, let’s begin.
Proxmox Setup
Installing the required packages
Ok. We will start with the packages we need for this deployment. I will be using OCFS2 for the cluster file system. Do this on every proxmox node.
Proxmox-01
proxmox-01 :: / » apt update -y ; apt install ocfs2-tools
Proxmox-02
proxmox-02 :: ~ » apt update -y ; apt install ocfs2-tools
Setting up the ocfs2 cluster
Alright, now set the following in the ocfs2 configuration file. “pve” is the name of the cluster. You can change this to whatever you want.
Again, do this on every node.
Proxmox-01
proxmox-01 :: / » vim /etc/default/o2cb
O2CB_ENABLED=true
O2CB_BOOTCLUSTER=pve
Proxmox-02
proxmox-02 :: / » vim /etc/default/o2cb
O2CB_ENABLED=true
O2CB_BOOTCLUSTER=pve
Next, we add the cluster to the ocfs2 configuration and the nodes to the cluster. We only need to do this on a single host.
Proxmox-01
proxmox-01 :: ~ » o2cb add-cluster pve
proxmox-01 :: ~ » o2cb add-node --ip 192.168.152.15 pve proxmox-01
proxmox-01 :: ~ » o2cb add-node --ip 192.168.152.16 pve proxmox-02
Now, copy the cluster.conf file from /etc/ocfs2 to the other node.
proxmox-01 :: ~ » scp /etc/ocfs2/cluster.conf root@192.168.152.16:/etc/ocfs2
Check if the cluster is running.
Proxmox-01
proxmox-01 :: ~ » o2cb cluster-status
Cluster 'pve' is online
Proxmox-02
proxmox-02 :: ~ » o2cb cluster-status
offline
If it’s offline, restart the service.
proxmox-02 :: ~ » systemctl restart o2cb.service
Ok. That’s it for now. Let’s switch to the HPE Alletra.
Configure HPE Alletra Volume
Let’s take a quick look at the dashboard.
We can see that we have 30TB of usable storage and a bit of disk usage. I was running a few VMs earlier, to test the system and check if everything works. Ignore the error message. 🙂
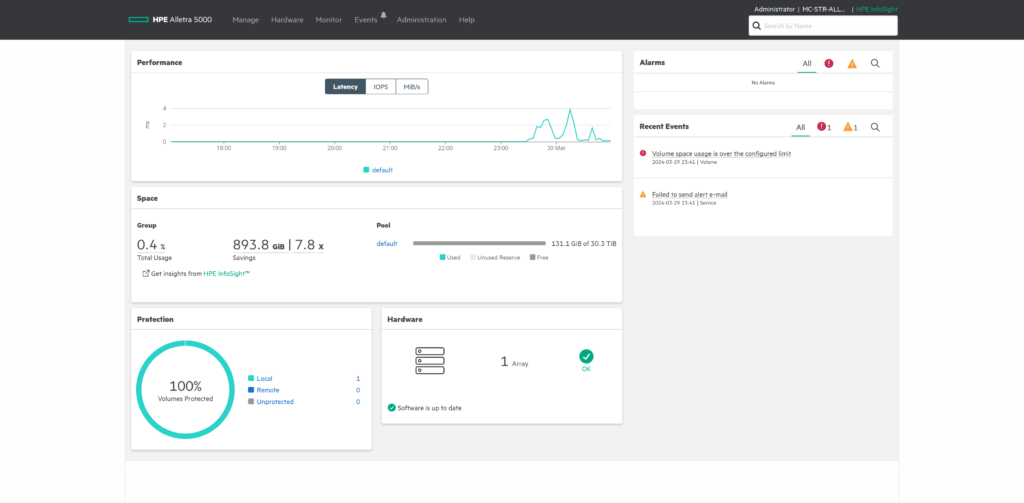
Setting up the network interface
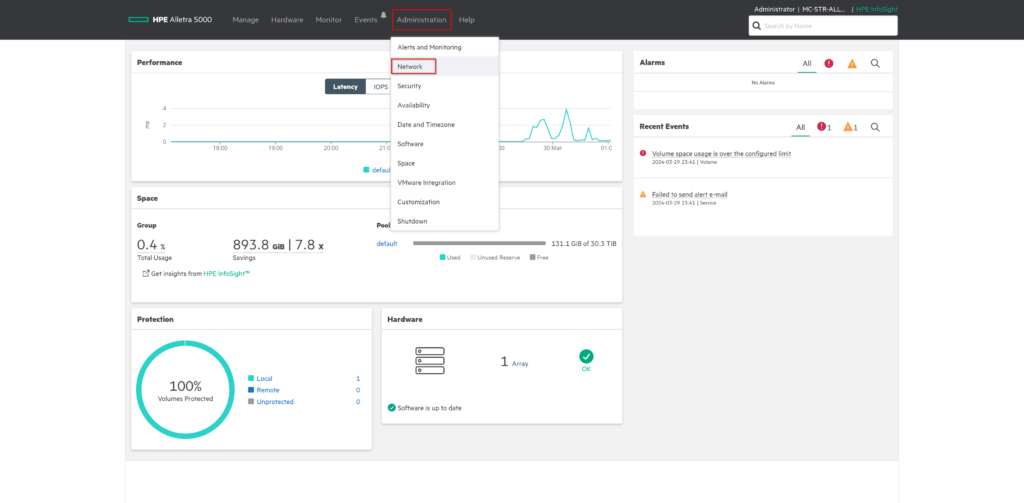
Ok. Let’s setup the network first. Click on “Administration” -> “Network”, where we create our first subnet.
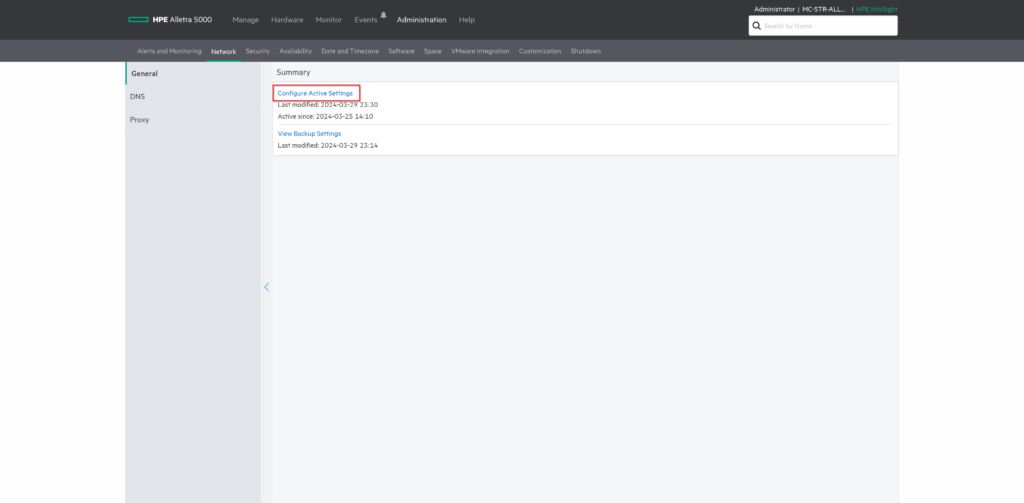
Select “configure Active Settings”.
First window will be our “Management IP”. We won’t change anything here. Switch to the “Subnets” tab.
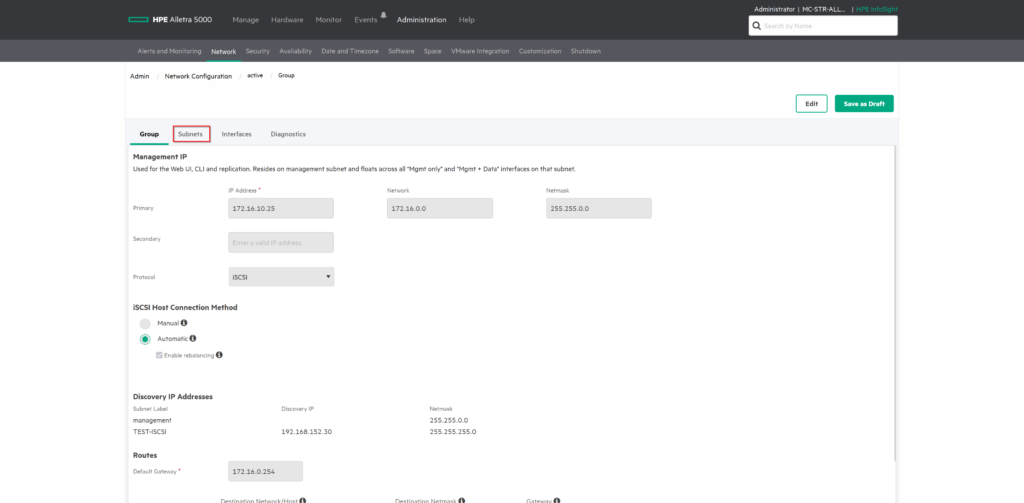
Now, here we can configure our network, which will be used for iSCSI. Click on “Edit” and “Add”. (Ignore the existing iSCSI network in the screenshots).
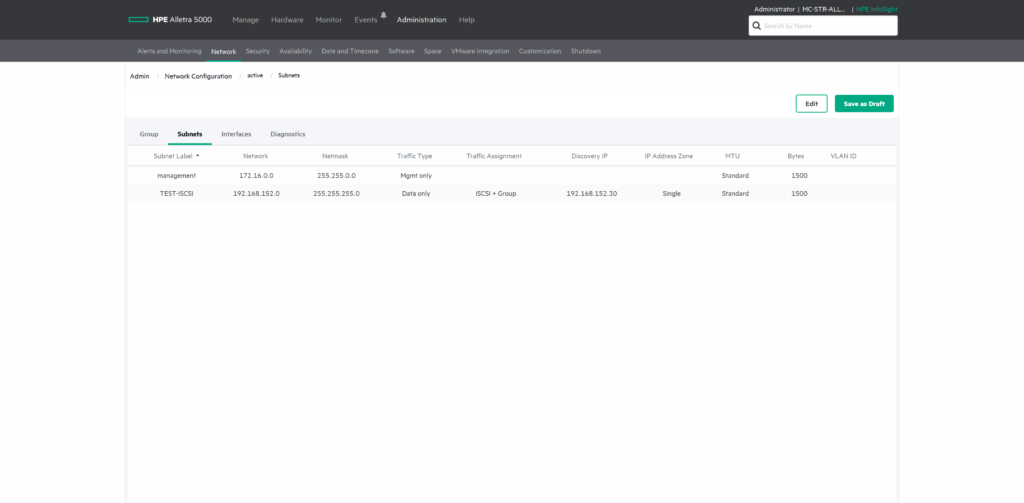
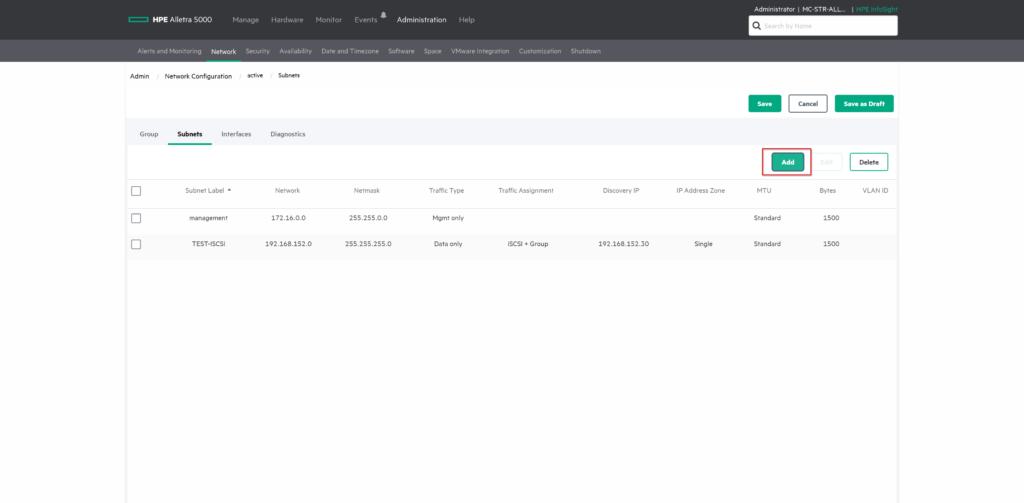
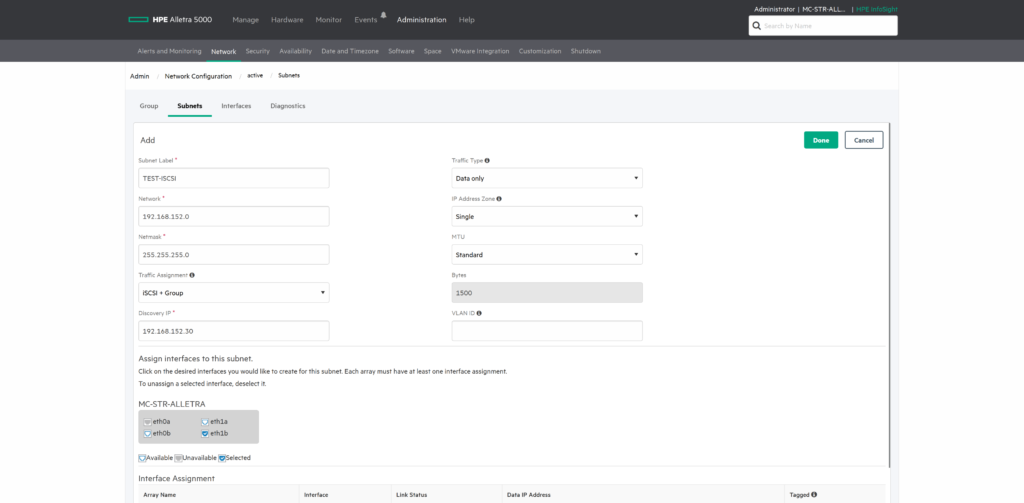
Choose an appropriate name for the new subnet and specify the desired IP address. I will be leaving the VLAN empty, since the switch port will be untagged.
| Subnet Label | TEST-ISCSI |
| Network | 192.168.152.0 |
| Netmask | 255.255.255.0 |
| Discovery IP | 192.168.152.30 |
| Traffic Assigment | iSCSI + Group |
| Traffic Type | Data only |
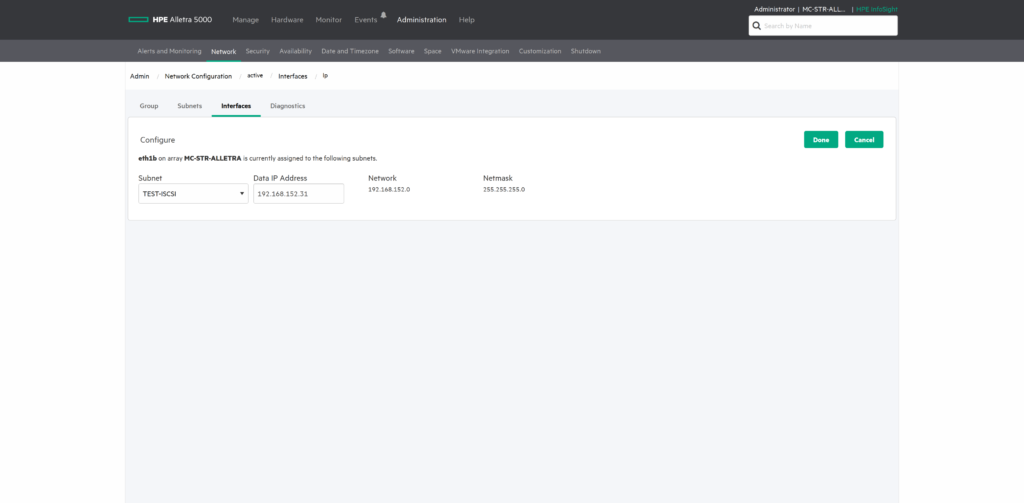
Now that we have the subnet, we can assign it to an interface. Switch to the “Interfaces” tab.
Select one of the interfaces and click on “Configure”.
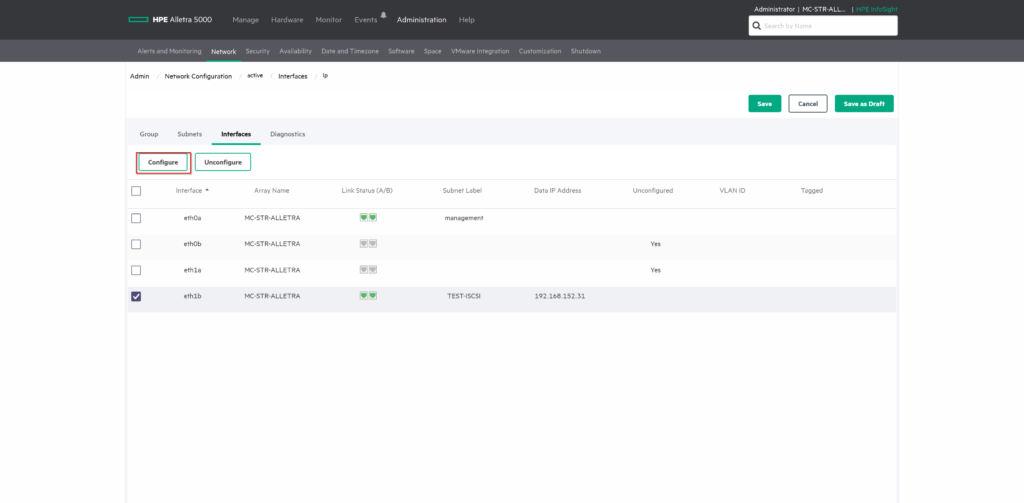
Select your newly created subnet and enter an IP address you want to use for this interface. “192.168.152.31” in my case.
Setting up the Data Storage
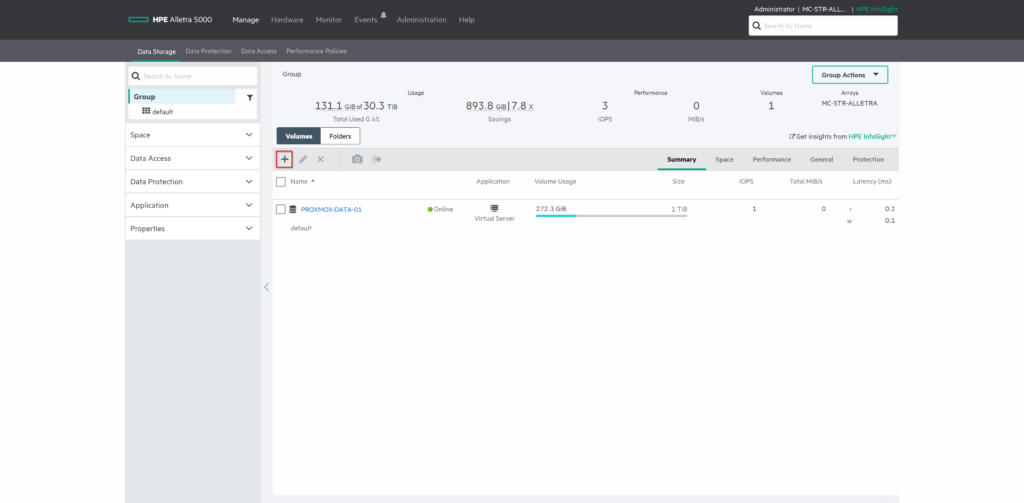
Now we need a volume, so we can actually use the storage. Navigate to “Manage” and click on the + sign.
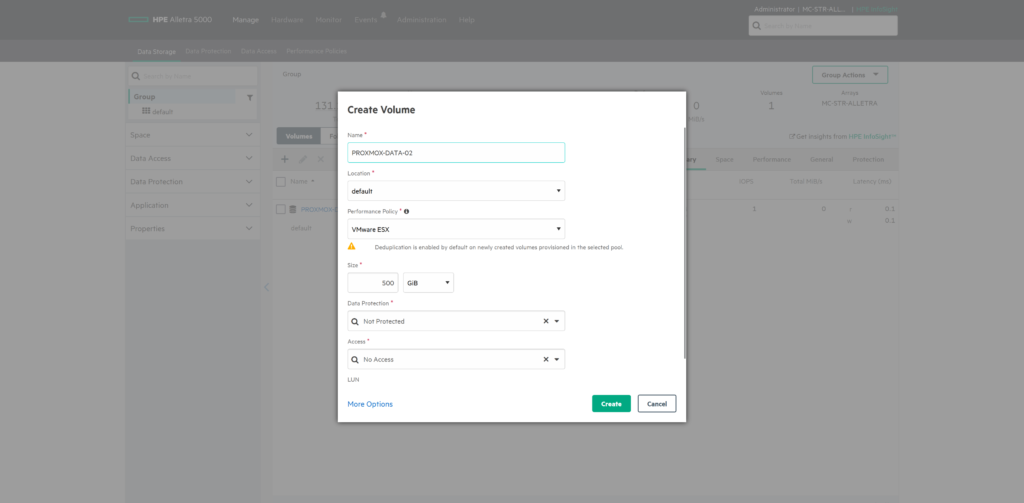
Give the volume a nice name, set the “location” (there should be only one default), the “Performance Policy” (I will be using VMWare ESX for this) and the size you want to assign.
The “Performance Policy” just sets a few parameters, like block size (4k), deduplication on new volumes (disabled), compression (enabled) and so on.
We will leave the “Data Protection” and “Access” on “not protected” and “no access” for now.
Great. Now we need to grant access to our two Proxmox nodes.
Setting up the Data Access
First we need the IQNs from the Proxmox nodes. For this, SSH into them again and execute the following.
This should show you the initiator name of the node. We will need this, so we can tell the HPE Alletra storage that this system is allowed to access the LUN.
Proxmox-01
proxmox-01 :: ~ » cat /etc/iscsi/initiatorname.iscsi
InitiatorName=iqn.1993-08.org.debian:01:704d68525ca
Proxmox-02
proxmox-02 :: ~ » cat /etc/iscsi/initiatorname.iscsi
InitiatorName=iqn.1993-08.org.debian:01:db1a7b87ba4c
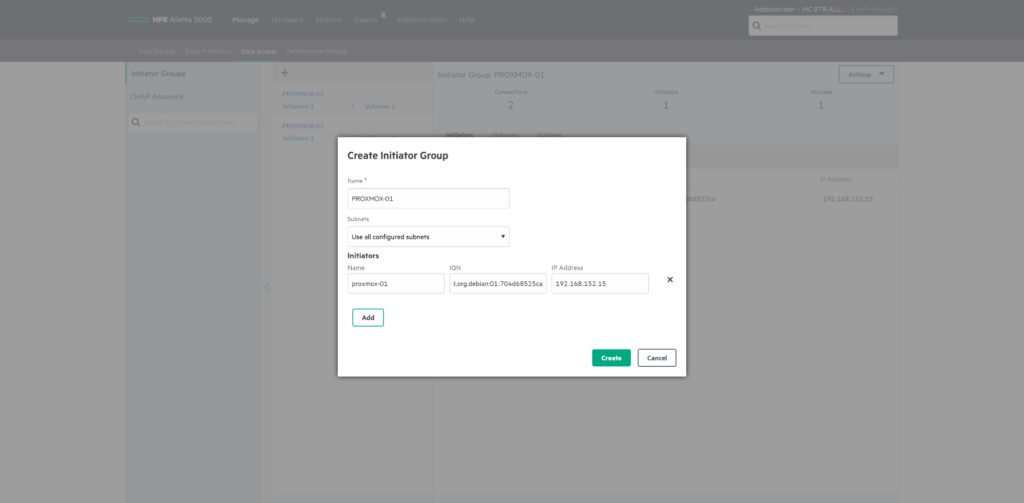
Ok, let’s go back to the Alletra. Navigate to “Manage” -> “Data Access” and click on the + symbol.
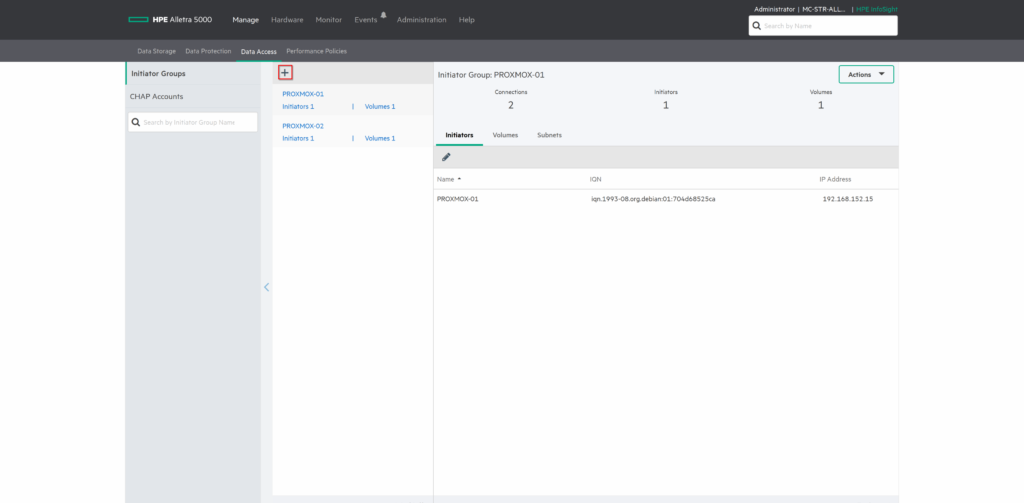
Here we can create a Initiator Group. Enter a fitting name, the IQN and the IP address of the Proxmox node. The following in my case.
Do this for both nodes.
| Name | proxmox-01 |
| IQN | iqn.1993-08.org.debian:01:704d68525ca |
| IP Address | 192.168.152.15 |
| Name | proxmox-02 |
| IQN | iqn.1993-08.org.debian:01:db1a7b87ba4c |
| IP Address | 192.168.152.16 |
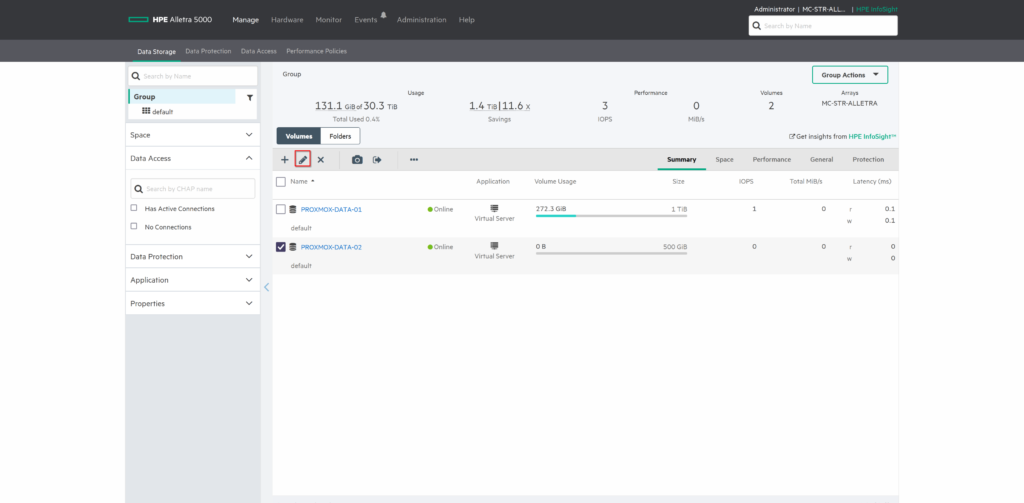
Navigate back to the “Data Storage” and select the newly created volume.
Click on the “edit” symbol.
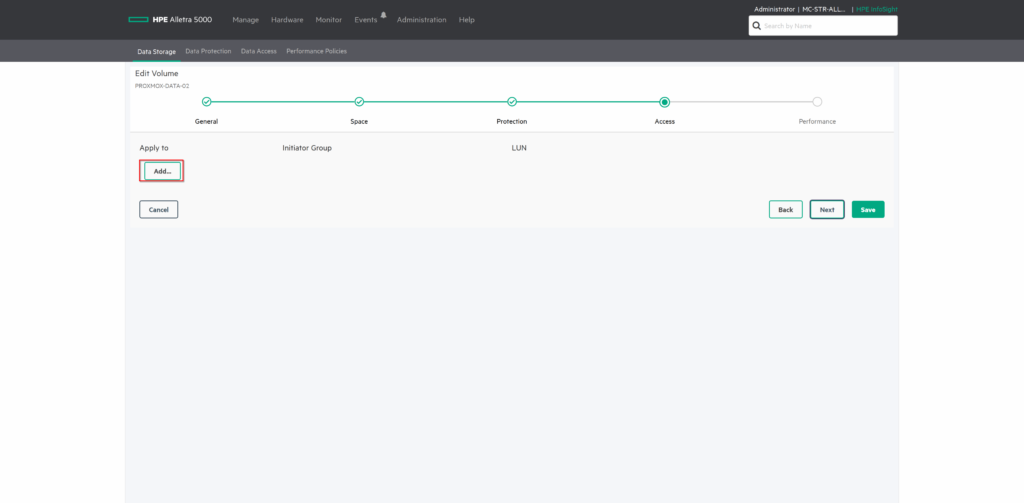
Click “Next” a few times, until you get to the “Access” tab.
Here we can assign the “Initiator Groups” to the volume.
Click on “Save”.
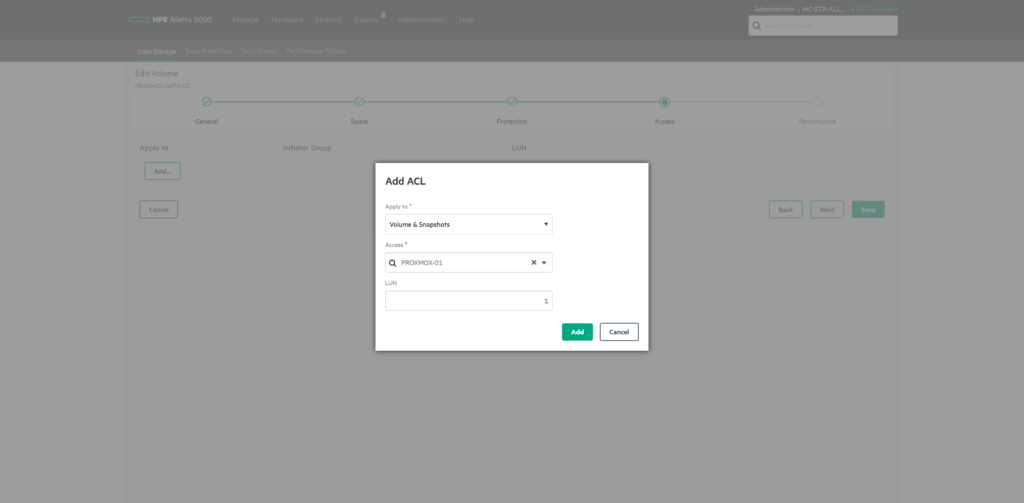
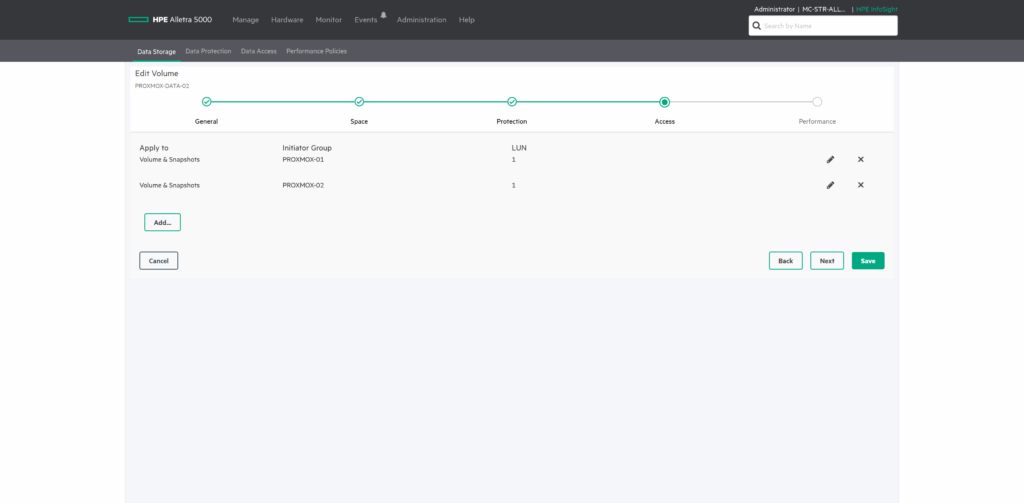
That’s it for the HPE Alletra for now. Let’s log into the Proxmox WebUI.
Proxmox Storage Configuration
Adding iSCSI LUN
Now, before we add the iSCSI targets, we should edit the iscsid.conf file.
Navigate on both nodes to /etc/iscsi and edit the following lines in the mentioned file.
Proxmox-01
proxmox-01 :: /etc/iscsi » vim iscsid.conf
# change the line "node.startup = manual" to this:
node.startup = automatic

#change the line "node.session.timeo.replacement_timeout = 120" to this:
node.session.timeo.replacement_timeout = 15
If you already added the iSCSI LUNs, you have to edit the “default” file under the /etc/iscsi/nodes/<IQN>/<IP>/ folder.
This and the line in the fstab file (this will be shown later) should ensure that the LUN is mapped and mounted after boot.
The next few steps won’t be pretty, but they worked for me. Once we are in, select the “storage” tab under the cluster. Here we click on “Add” and select “iSCSI”.
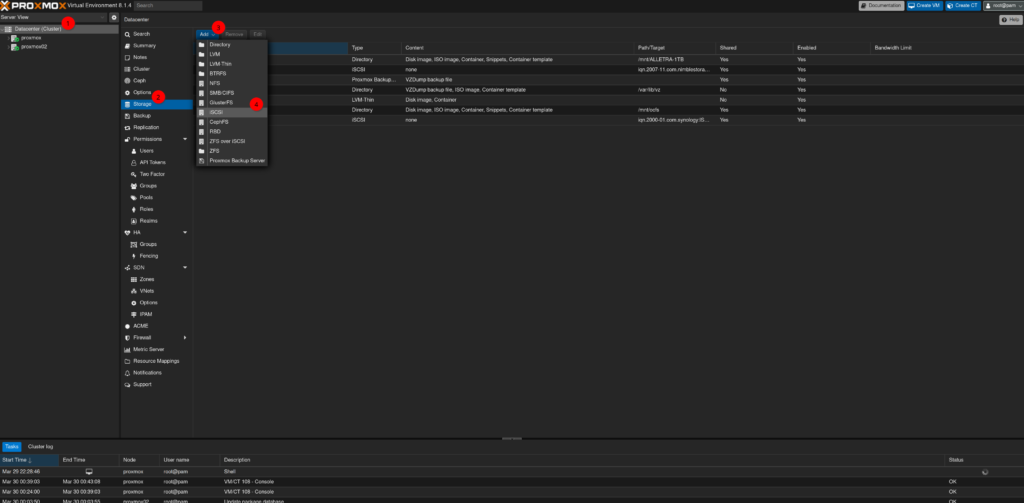
Enter a name for the “ID” and the discovery IP in the “portal”. If everything was set up correctly, it should show up. Deselect “Use LUNs directly” and click on “Add”.
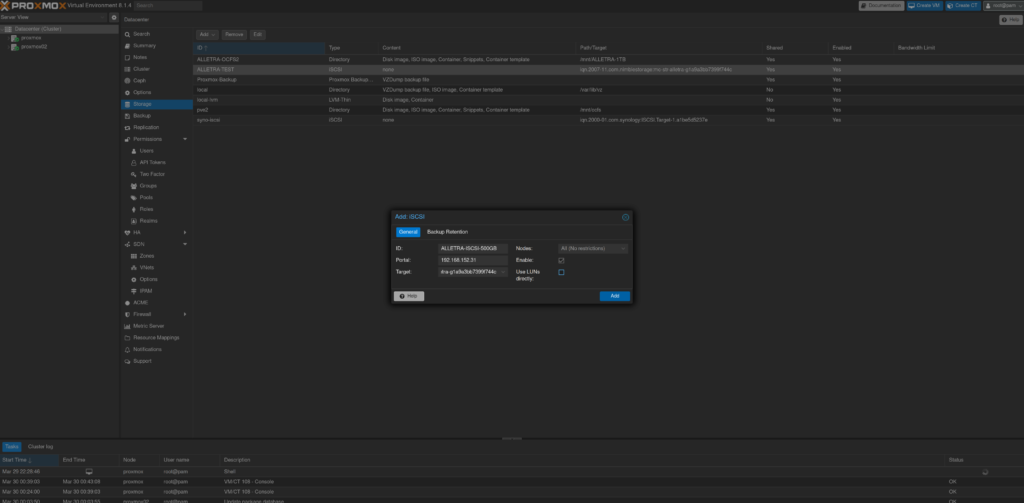
So why did we not allow Proxmox to use the LUNs directly? Because there a few disadvantages, mainly no snapshots support and that’s a no go. That’s why we will set up OCFS2 and map it as a shared local directory.
Let’s continue.
The next steps need to be executed from the command line, so connect to one of the nodes via SSH.
Check if the LUN has shown up.
Proxmox-01
proxmox-01 :: / » lsblk
sdd                            8:48   0   500G  0 disk
Well, you have to trust me, that this is actually the iSCSI LUN. 🙂
But we can check again with iscsiadm. We can see the LUN at the bottom in red.
Proxmox-01
proxmox-01 :: / » iscsiadm -m session -P3
Target: iqn.2007-11.com.nimblestorage:mc-str-alletra-g1a9a3bb7399f744c (non-flash)
        Current Portal: 192.168.152.31:3260,2461
        Persistent Portal: 192.168.152.31:3260,2461
                **********
                Interface:
                **********
                Iface Name: default
                Iface Transport: tcp
                Iface Initiatorname: iqn.1993-08.org.debian:01:704d68525ca
                Iface IPaddress: 192.168.152.15
                Iface HWaddress: default
                Iface Netdev: default
                SID: 2
                iSCSI Connection State: LOGGED IN
                iSCSI Session State: LOGGED_IN
                Internal iscsid Session State: NO CHANGE
                *********
                Timeouts:
                *********
                Recovery Timeout: 120
                Target Reset Timeout: 30
                LUN Reset Timeout: 30
                Abort Timeout: 15
                *****
                CHAP:
                *****
                username: <empty>
                password: ********
                username_in: <empty>
                password_in: ********
                ************************
                Negotiated iSCSI params:
                ************************
                HeaderDigest: None
                DataDigest: None
                MaxRecvDataSegmentLength: 262144
                MaxXmitDataSegmentLength: 262144
                FirstBurstLength: 32768
                MaxBurstLength: 16773120
                ImmediateData: Yes
                InitialR2T: Yes
                MaxOutstandingR2T: 1
                ************************
                Attached SCSI devices:
                ************************
                Host Number: 4  State: running
                scsi4 Channel 00 Id 0 Lun: 0
                        Attached scsi disk sdc          State: running
                scsi4 Channel 00 Id 0 Lun: 1
                        Attached scsi disk sdd          State: running
Great. Let create the OCFS2 filesystem. This is only required on a single host.
Ensure that you have selected the correct disk.
Proxmox-01
proxmox-01 :: / » mkfs.ocfs2 -J block64 -T vmstore -L ALLETRA-ISCSI-500GB /dev/sdd
mkfs.ocfs2 1.8.7
Cluster stack: classic o2cb
Filesystem Type of vmstore
Label: ALLETRA-ISCSI-500GB
Features: sparse extended-slotmap backup-super unwritten inline-data strict-journal-super xattr indexed-dirs refcount discontig-bg append-dio
Block size: 4096 (12 bits)
Cluster size: 1048576 (20 bits)
Volume size: 536870912000 (512000 clusters) (131072000 blocks)
Cluster groups: 16 (tail covers 28160 clusters, rest cover 32256 clusters)
Extent allocator size: 201326592 (48 groups)
Journal size: 134217728
Node slots: 8
Creating bitmaps: done
Initializing superblock: done
Writing system files: done
Writing superblock: done
Writing backup superblock: 5 block(s)
Formatting Journals: done
Growing extent allocator: done
Formatting slot map: done
Formatting quota files: done
Writing lost+found: done
mkfs.ocfs2 successful
Alright. Next, edit the fstab file. We have to do this on all nodes.
Proxmox-01
proxmox-01 :: / » vim /etc/fstab
LABEL=ALLETRA-ISCSI-500GB /mnt/ALLETRA-ISCSI-500GB ocfs2 _netdev,defaults,x-systemd.requires=iscsi.service 0 0
Proxmox-02
proxmox-02 :: / » vim /etc/fstab
LABEL=ALLETRA-ISCSI-500GB /mnt/ALLETRA-ISCSI-500GB ocfs2 _netdev,defaults,x-systemd.requires=iscsi.service 0 0
Now, create the folder and mount the filesystem.
Proxmox-01
# Create the folder
proxmox-01 :: / » mkdir /mnt/ALLETRA-ISCSI-500GB
# Reload the daemons otherwise you will get an error message on the next command
proxmox-01 :: / » systemctl daemon-reload
# Mount the filesystem
proxmox-01 :: / » mount /mnt/ALLETRA-ISCSI-500GB
Proxmox-02
# Create the folder
proxmox-02 :: / » mkdir /mnt/ALLETRA-ISCSI-500GB
# Reload the daemons otherwise you will get an error message on the next command
proxmox-02 :: / » systemctl daemon-reload
# Mount the filesystem
proxmox-02 :: / » mount /mnt/ALLETRA-ISCSI-500GB
The next few steps I got from another guide. I don’t know it this is still required but it makes sense. I didn’t test this. The idea is, that the filesystem has to be mounted before the Proxmox services start.
Add the following to the Proxmox service files.
Proxmox-01
proxmox-01 :: ~ » vim /lib/systemd/system/pve-cluster.service
[Unit]
After=remote-fs.target
Requires=remote-fs.target

proxmox-01 :: ~ » vim /lib/systemd/system/pve-storage.target
[Unit]
After=remote-fs.target
Requires=remote-fs.target
One last step before we can use the storage. Go back to the Proxmox WebUI storage configuration and this time select “directory”.
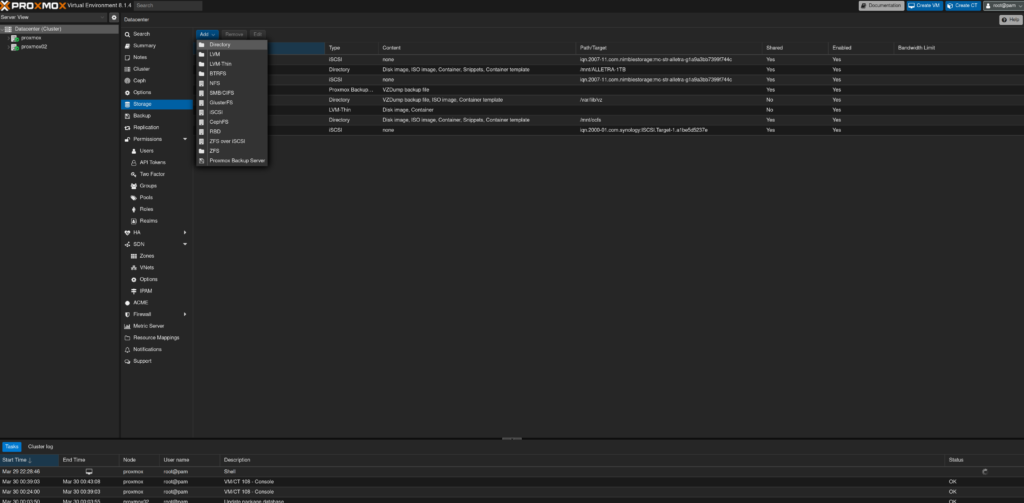
Give the new storage definition a nice name, set the path to our newly created folder and make sure you select “Shared”.
In the “Content” dropdown, select what you want this storage to be used for.
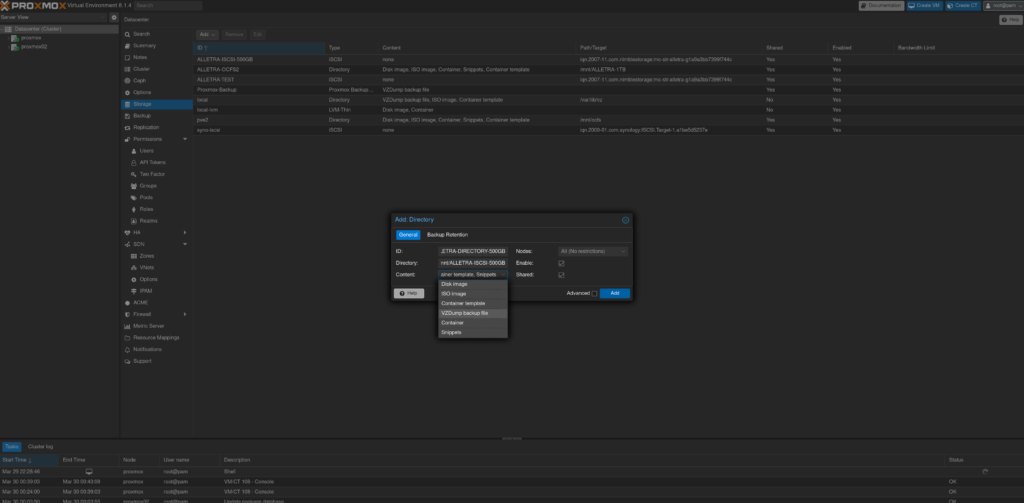
And that’s that.
Creating our “first” LXC Container
Download a Template
Let’s quickly create a LXC Container on our new LUN.
First we need a container template. Navigate to one of the nodes, select the LUN and click on “CT Templates”.
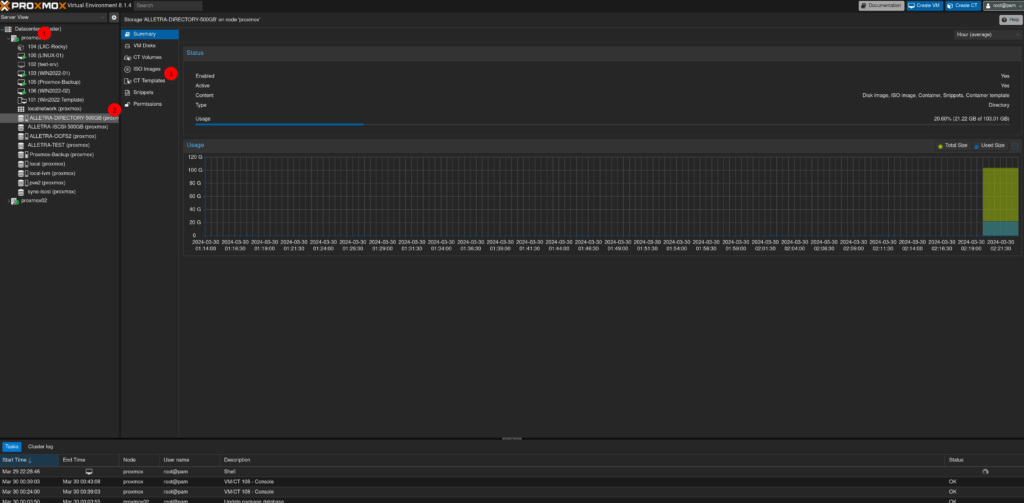
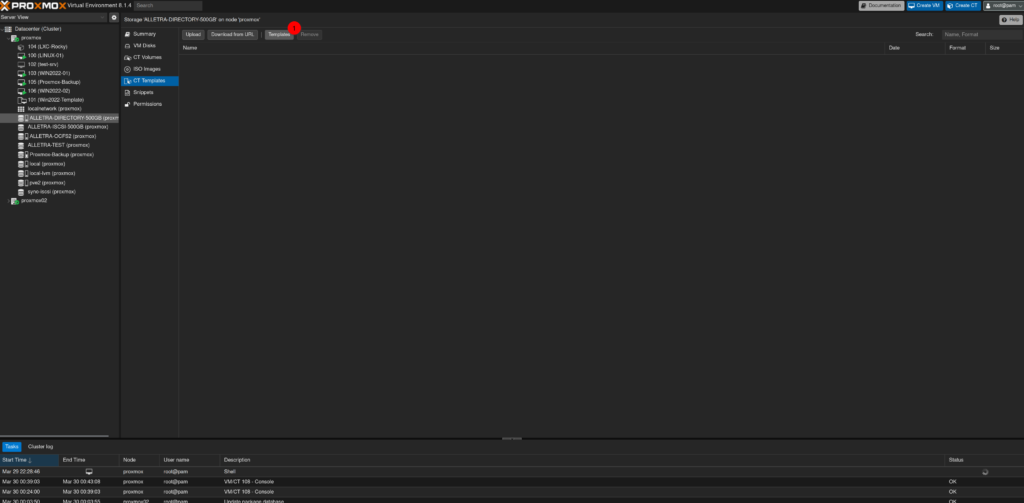
Click on “Templates”, select an template you wish to deploy and click on Download.
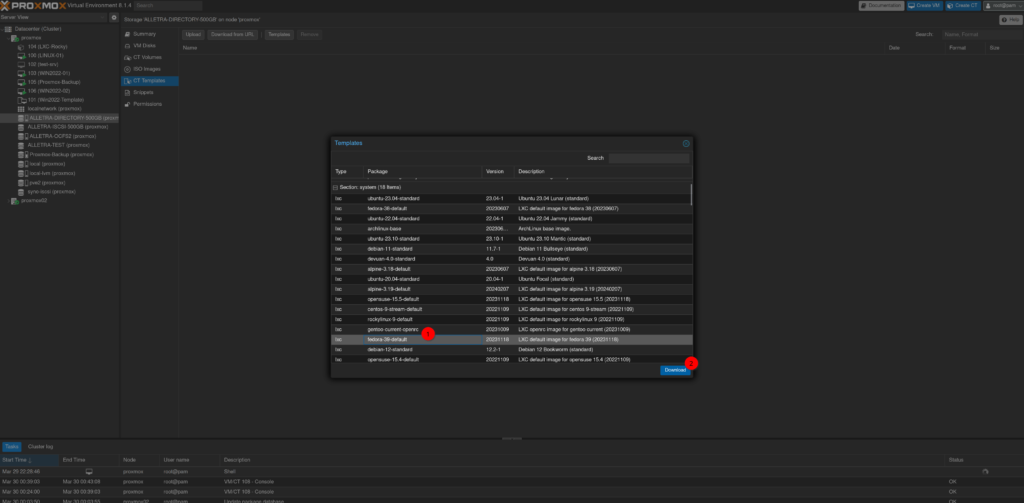
Deploy an LXC Container
Now we can deploy the container.
Select “Create CT” on the top right corner.
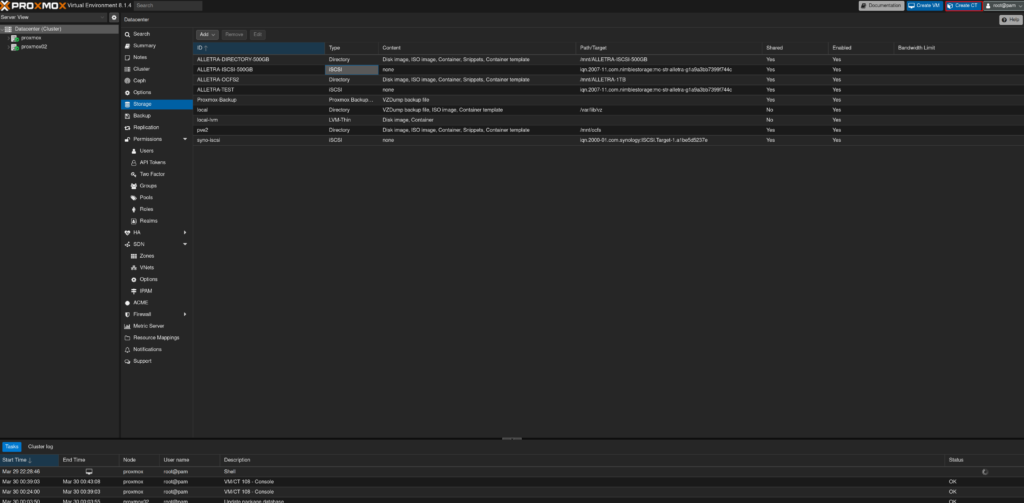
Enter the required fields like password and hostname. Click on “Next”.
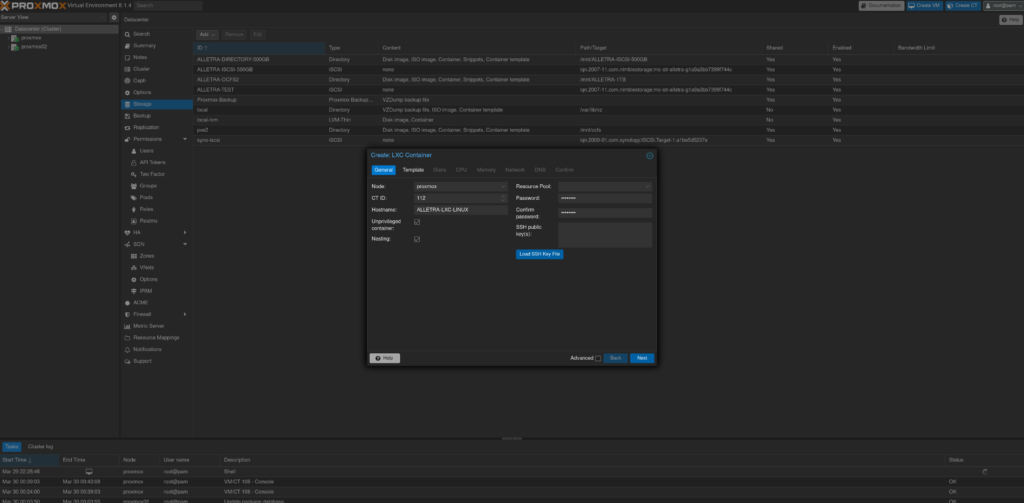
Select the template and select “Next”.
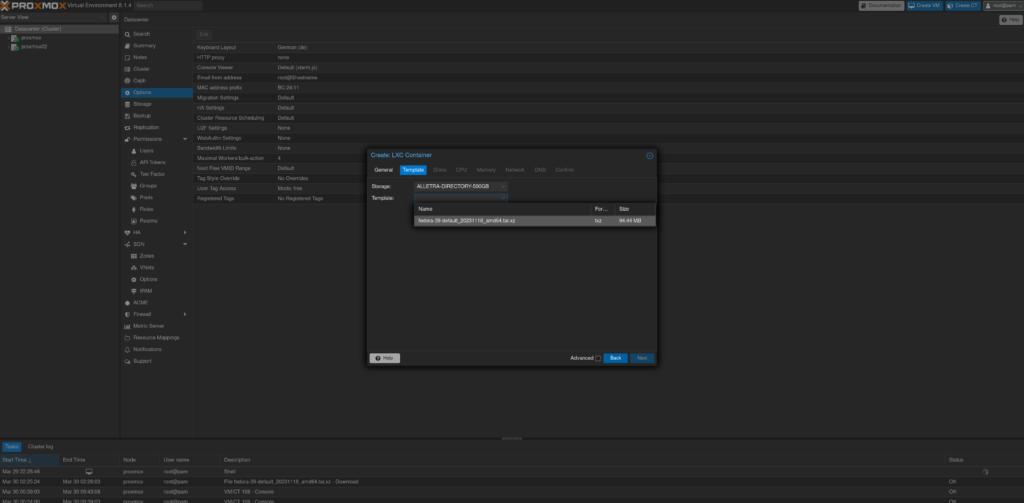
Set the disk size, I will leave it at the default 8GB.
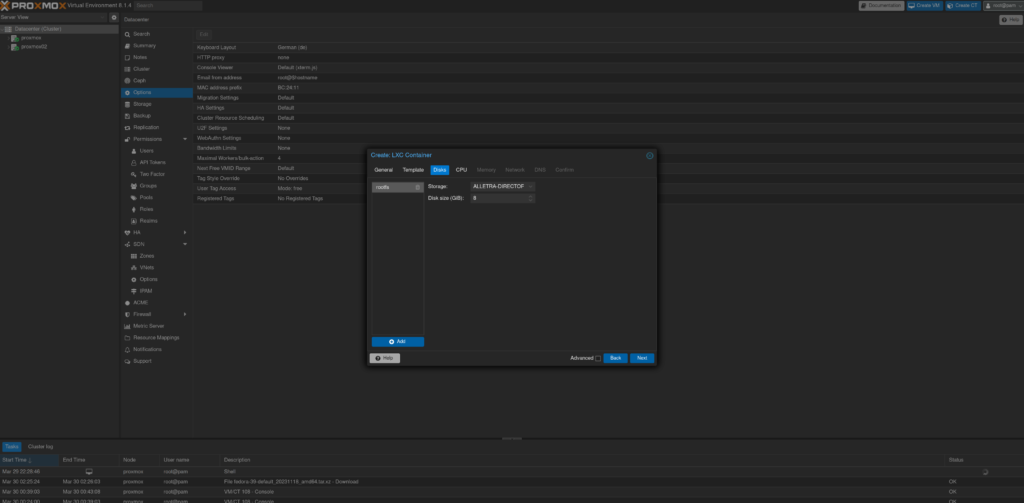
Choose the amount of CPU cores. I will set it to two.
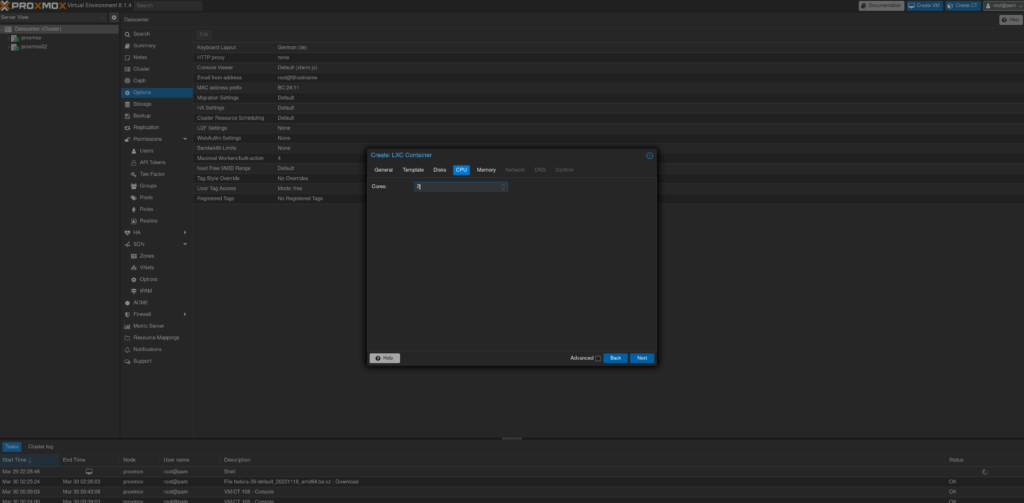
I will set the memory to 2048MB.
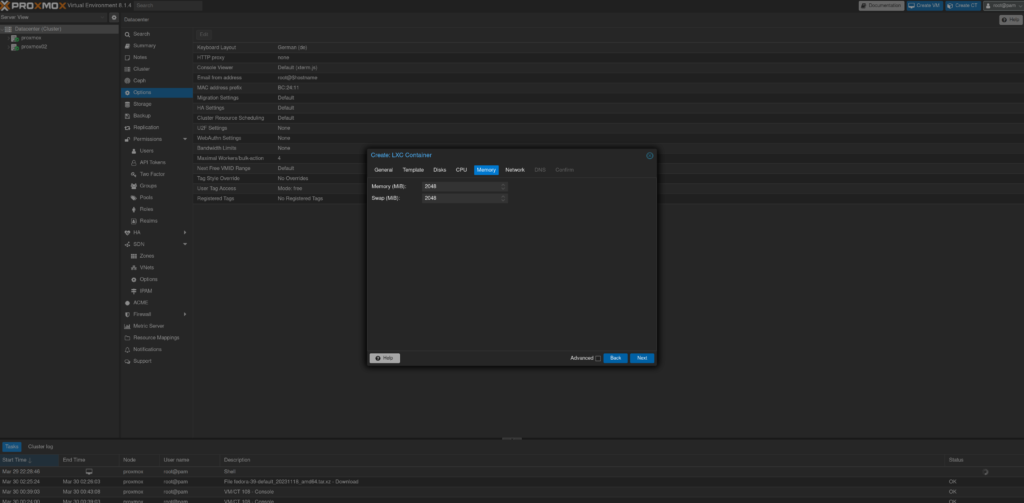
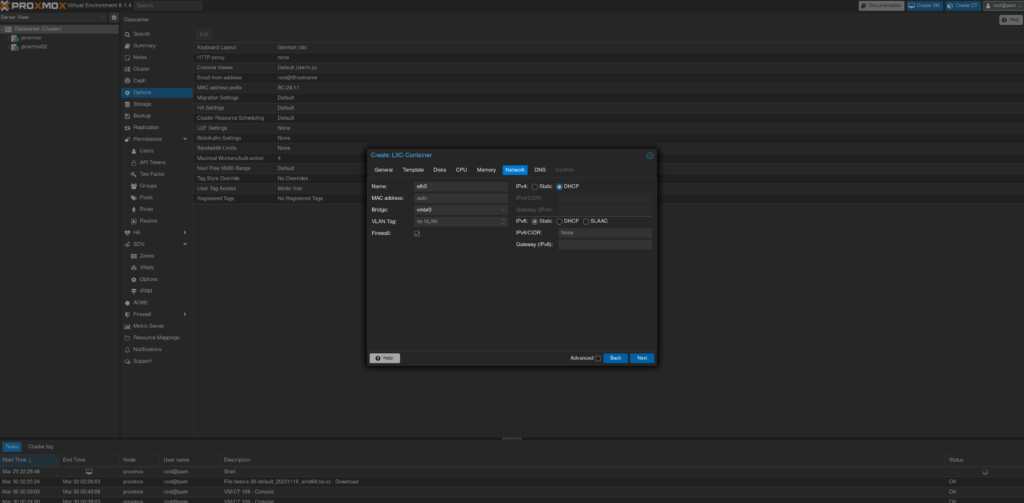
Either give the VM a static IP or change it to DHCP.
Set your DNS settings.
And confirm the settings with “Finish”. You can also set the “Start after created”.
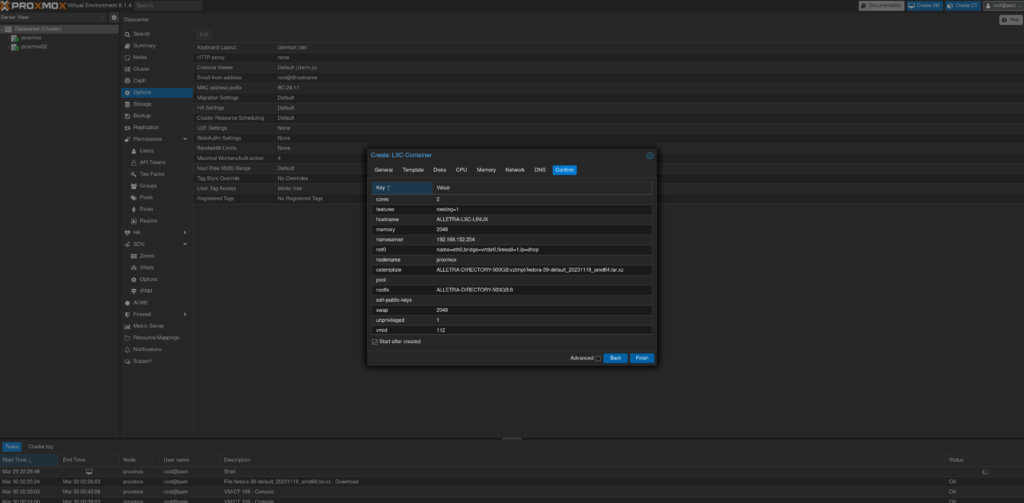
After a few seconds, the VM should boot. We can also check the storage it is using.
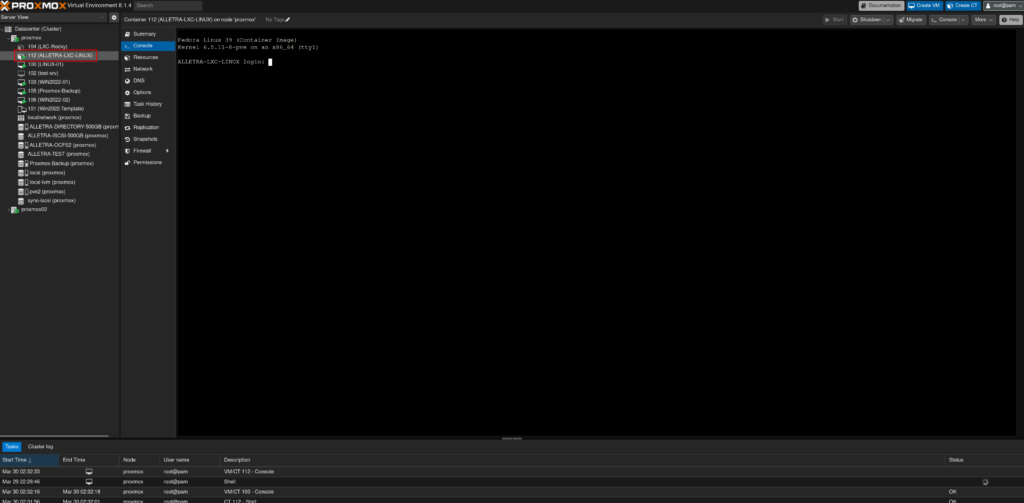
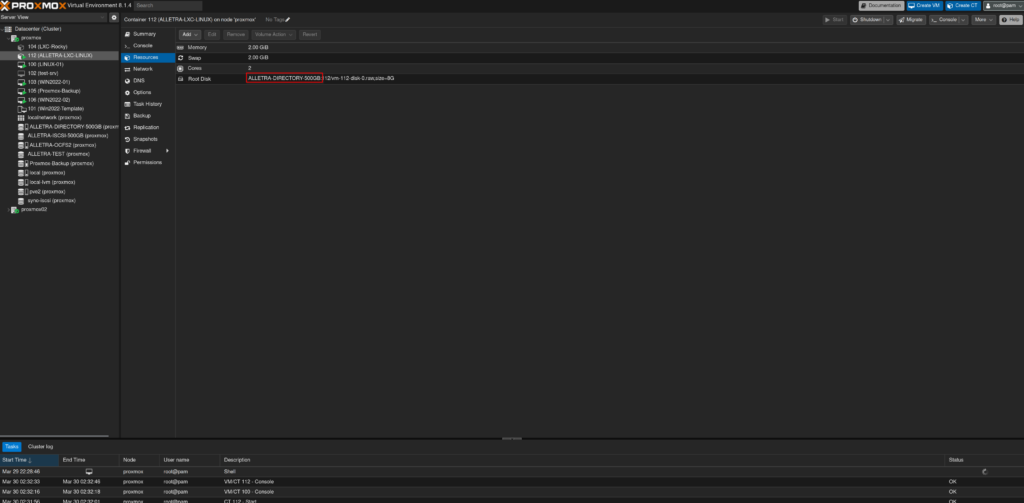
And, while we are at it, let’s do a quick node migration. Right-click on the LXC container and select “Migrate” and click on “Migrate”. (Keep in mind that we cannot actually live migrate LXC containers)
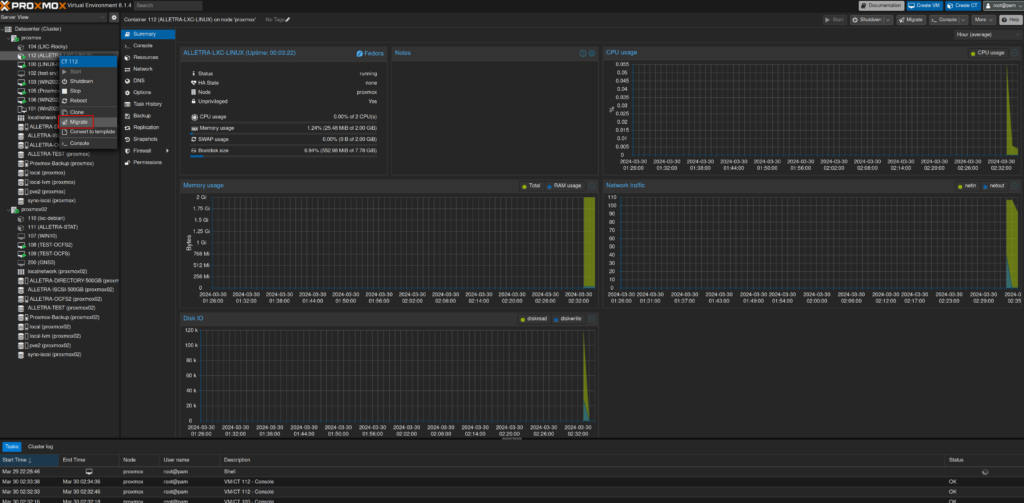
And it’s on the other host… Nice.
Now, there are a few problems with this setup. For example, if the system fails to mount the OCFS2 filesystem during boot, Proxmox will proceed to create VMs on the local disk, and (of course) existing VMs won’t boot. You also won’t get an error message, because the directory is technically there and working. So make sure your monitoring is working.
Also, we have two entries for the storage. One is the iSCSI and the other is the directory. We could mount the iSCSI LUN using the CLI, which would probably hide the iSCSI target in the Proxmox UI, but I was to lazy.
Further testing required
A few more things. I did not use multipathing, since I only have single paths from the Proxmox hosts to the Alletra storage, but this is definitely something I want to check and share with you in the future. Also I did not test the stability of this setup, which is kind of important… Have to test this as well, somehow.
There is also no working HA, because I don’t have a third host or a witness. It is currently very unlikely that I will get a third host, so I will try to set up a witness on some random system I have lying around.
So that’s it. If you want me to test something, just leave a comment.