Installation and configuration of GNS3 GUI
Hello there. This is part 2 of my (so far) two-part guide on how to install and configure GNS3 on Linux KVM. If you missed part 1, click here or the button on the top of the page.
In this part, we will install the GNS3 GUI, configure it and import a few appliances.
Let’s begin.
- First, make sure that your GNS3 VM is running. Start virt-manager, select the “GNS3 VM” and click on the “start” button.

2. Ok. Now write down the IP address and port of your VM. We will need this later to connect from GNS3 GUI.

3. Now, you could install GNS3 with the package manager “dnf” in Fedora. But the version on there is quite old (Version 2.2.21 at the time of writing). That’s why I am going to use “pip”, which seems to provide the latest release.
Keep in mind that the “GNS3 VM” version has to be identical to “GNS3 GUI”.
Install “pip” and all the required dependencies. Also, install “telnet” (this is used to connect to the serial port of the devices) and “Wireshark”. This is not a requirement, only a recommendation.
fedora-kde :: ~ » sudo dnf install pyhton3-pip
fedora-kde :: ~ » sudo dnf install python3-{attrs,configobj,jsonschema,psutil,pyqt5-sip,pyrsistent,qt5,qt5-base,raven}
fedora-kde :: ~ » sudo dnf install telnet wireshark
4. Install GNS3 GUI using pip3.
This shouldn’t throw any error messages if all the dependencies are installed correctly.
fedora-kde :: ~ » pip3 install --user gns3-gui
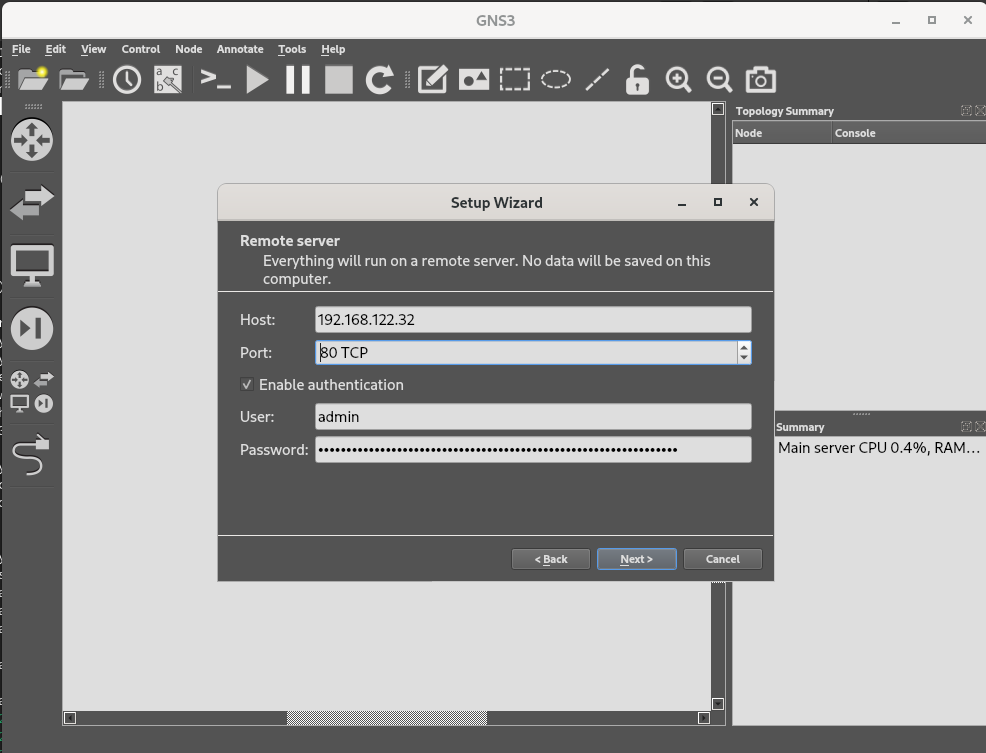
5. Now we can start “GNS3 GUI”. You will actually get a few error messages, telling you that the application cannot find gns3-server. This is correct, since we did not install it. Click OK a couple of times and you will get the “Setup Wizard” window.
Here choose “Run appliances on a remote server (advanced usage)”

Enter the IP and port from your GNS3 VM. Leave user and password at its default and click on “Next”.

6. Next you will get a summary of the configuration. Select “Finish”.
That’s it for the configuration of “GNS3 GUI”. After a few seconds, the Server should show up under “Server Summary”.
Let’s import a couple of VMs and maybe a couple of docker images to get started.
Import of appliances.
I will be using a Sophos XG and ArubaOS-CX image for the appliances. The configuration templates, you can get from the “GNS3 marketplace“. The images you need to get from the corresponding websites.
For the Sophos image, you only need to create a free account as far as I know. The Aruba image is a bit more difficult. This requires either the partner status or an active registration for one of their CX switches.
For this guide, I will only show how to import the Sophos XG image. The steps for ArubaOS-CX are basically the same.
Let’s start with the Sophos XG appliance.
- Download the appliance configurations from the marketplace. Search for “Sophos XG” and click on “Download”. The filename should be something like “sophos-xg.gns3a”. Do the same for the ArubaOS-CX configuration.
- Download the “Virtual Installers: Firewall OS for KVM” from the Sophos homepage. The latest version at the time of writing this is “18.5.1”. You should have a zip file named “VI-18.5.1_MR-1.KVM-326.zip”.
- Unzip the file, which should give you two files “PRIMARY-DISK.qcow2” and “AUXILIARY-DISK.qcow2”. We will need both.
fedora-kde :: Downloads » unzip VI-18.5.1_MR-1.KVM-326.zip
6. Rename both files as shown.
fedora-kde :: Downloads » mv PRIMARY-DISK.qcow2 VI-18.5.1_MR-1.KVM-326-PRIMARY.qcow2
fedora-kde :: Downloads » mv AUXILIARY-DISK.qcow2 VI-18.5.1_MR-1.KVM-326-AUXILIARY.qcow2
5. Good, now switch back to “GNS3 GUI”. Click on “File” in the upper left corner and select “Import appliance”. Search for the sophos-xg.gns3a” file and select it.

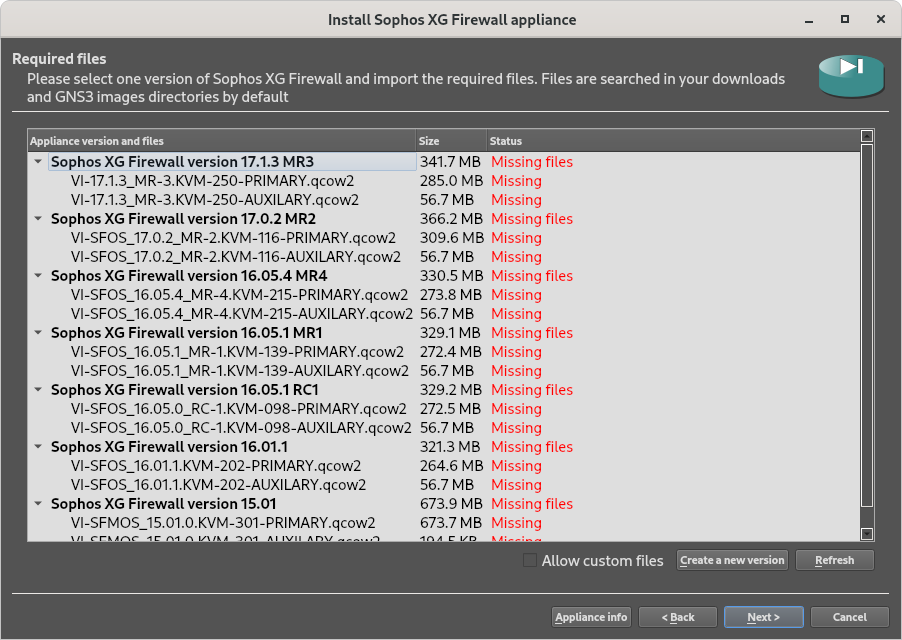
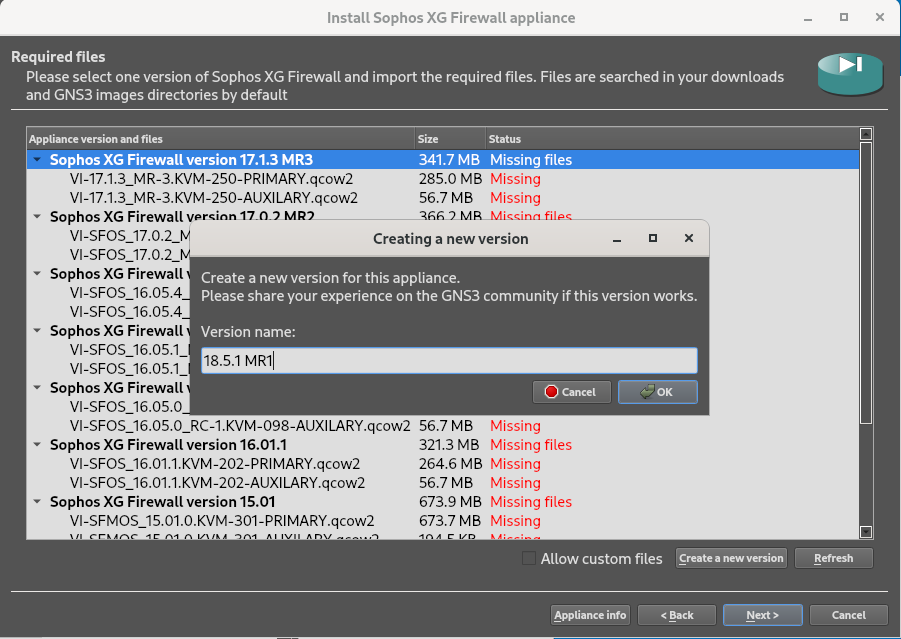
6. Click on “Next” a couple of times until you see a list with a bunch of versions. Select any version and click on “create a new version”.


A new window should open. Enter “18.5.1 MR1” and confirm.

7. Here it asks for the name of the PRIMARY disk. You need to type it in exactly. Do the same for the AUXILIARY disk.

8. Almost there. Select the PRIMARY from the list under 18.5.1. The one you just created. Click on “Import” and search for the qcow2 file you renamed earlier. Do the same with the AUXILIARY.

9. Select the newly created version again and click on “Next”. The application will ask you if you want to install Sophos XG Firewall version 18.5.1. Confirm.
Next, it will show instructions on how to use the VM. Click on “Finish”.
Install docker images (optional)
The last two appliances will be docker images. I will use “Ubuntu Docker Guest” and “Webterm”. Here are a few reasons why I like those two.
“Ubuntu” boots almost immediately and has most of the basic network tools. It’s great to test DHCP configurations and basic network connectivity. “Webterm” is great, because it automatically scales the display resolution to the current window size. It also has firefox preinstalled.
Let us continue.
10. You only need to download the “Ubuntu Docker Guest” and “Webterm” configuration files from the GNS3 Marketplace and import them into GNS3 GUI. Click “Next” a couple of times and you are done. After that, you can deploy the images.

That’s it. Hopefully, this was somewhat easy to follow. I might go for part 3 if I can think of anything useful to add.
See you next time.
Links: