Hello there,
Today, I want to set up a simple VXLAN configuration between 2 access switches connected to a VSX cluster. The cluster will be already configured. If you want to know how to set up VSX, check this post.
I will most likely create a second post, showing how to set this up utilizing EVPN.
VXLAN is a technology that creates an overlay network that allows us to span a layer 2 over a layer 3 network. Layer 2 packages are encapsulated by the tunnel endpoint (VTEP) and decapsulated at its destination (also a VTEP).
Never had a use case for this, but I wanted to try it out. So here we go.
Here is the topology.
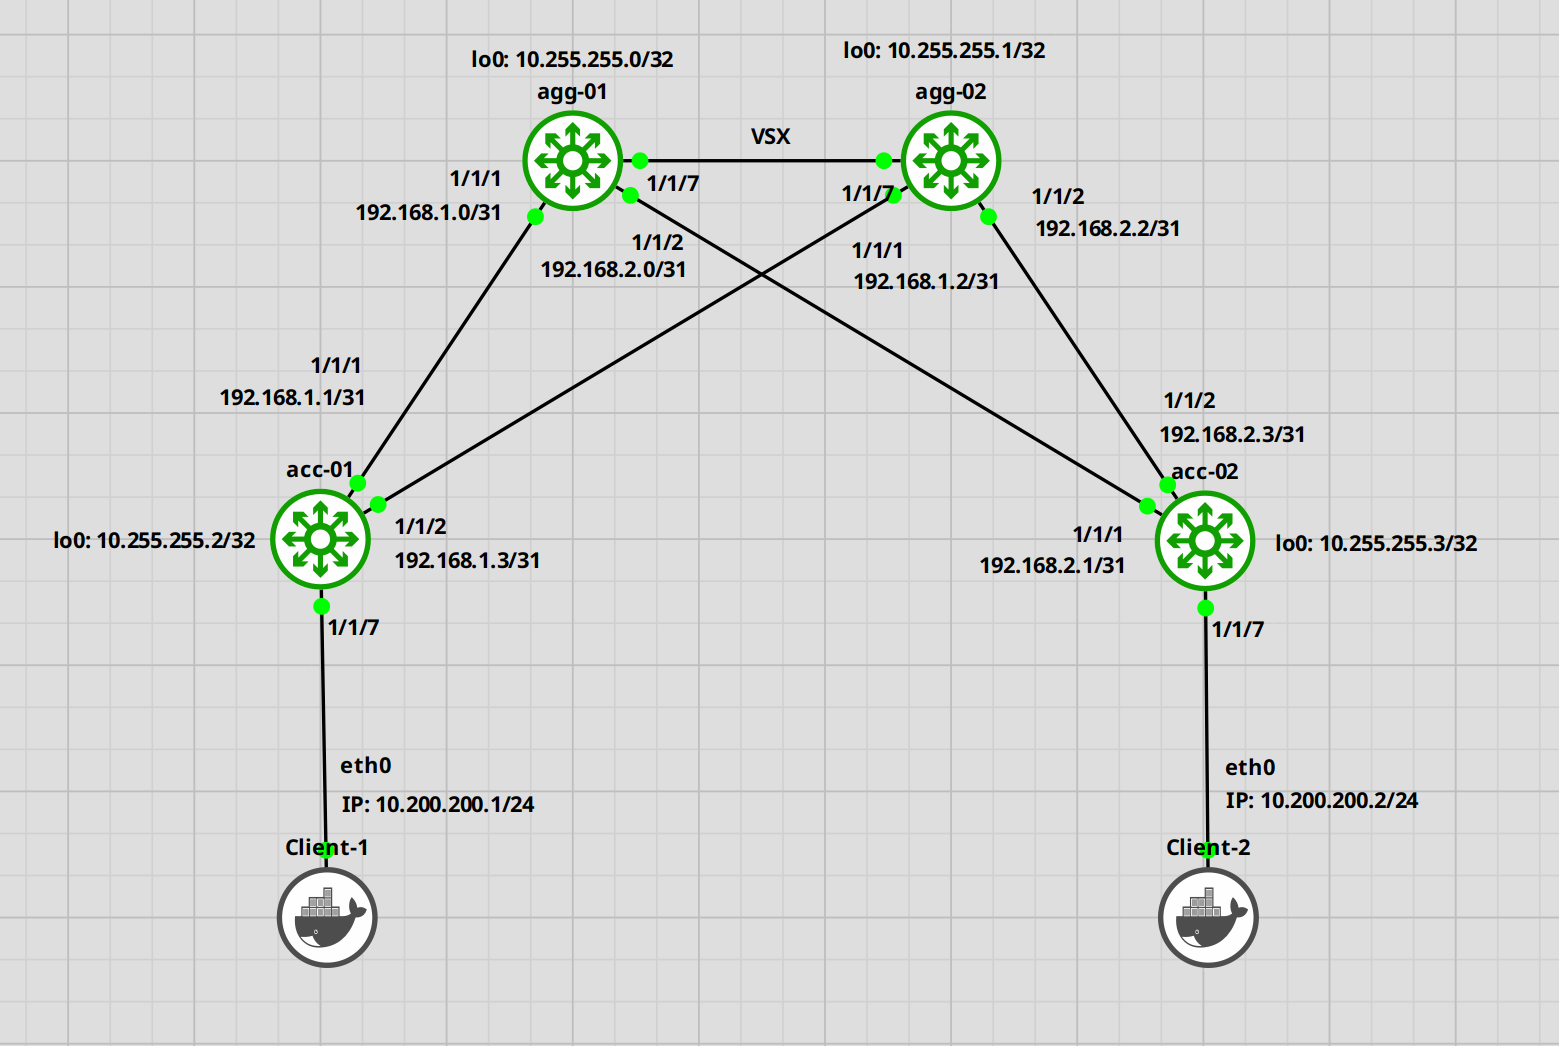
Let’s start.
Configuration of the Switches
Aggregation Switches
We will begin with the aggregation switches. We have to set the IP addresses and OSPF routing.
agg-01
agg-01(config)# interface loopback 0
agg-01(config-loopback-if)# ip address 10.255.255.0/32
agg-01(config-loopback-if)# ip ospf 1 area 0
OSPF process does not exist.
Do you want to create (y/n)? y
OSPF Area is not configured.
Do you want to create (y/n)? y
agg-01(config-loopback-if)# exit
agg-01(config)# interface 1/1/1
agg-01(config-if)# ip address 192.168.1.0/31
agg-01(config-if)# ip ospf 1 area 0
agg-01(config-if)# ip ospf network point-to-point
agg-01(config-if)# no shutdown
agg-01(config-if)# interface 1/1/2
agg-01(config-if)# ip address 192.168.2.0/31
agg-01(config-if)# ip ospf 1 area 0
agg-01(config-if)# ip ospf network point-to-point
agg-01(config-if)# no shutdown
That’s it for the first switch. Let’s do the same for the second.
agg-02
agg-02(config)# interface loopback 0
agg-02(config-loopback-if)# ip address 10.255.255.1/32
agg-02(config-loopback-if)# ip ospf 1 area 0
OSPF process does not exist.
Do you want to create (y/n)? y
OSPF Area is not configured.
Do you want to create (y/n)? y
agg-02(config-loopback-if)# interface 1/1/1
agg-02(config-if)# ip address 192.168.1.2/31
agg-02(config-if)# ip ospf 1 area 0
agg-02(config-if)# ip ospf network point-to-point
agg-02(config-if)# no shutdown
agg-02(config-if)# interface 1/1/2
agg-02(config-if)# ip address 192.168.2.2/31
agg-02(config-if)# ip ospf 1 area 0
agg-02(config-if)# ip ospf network point-to-point
agg-02(config-if)# no shutdown
Alright. Next are the access switches
Access Switches
The configuration is basically the same.
acc-01
acc-01(config)# interface loopback 0
acc-01(config-loopback-if)# ip address 10.255.255.2/32
acc-01(config-loopback-if)# ip ospf 1 area 0
OSPF process does not exist.
Do you want to create (y/n)? y
OSPF Area is not configured.
Do you want to create (y/n)? y
acc-01(config-loopback-if)# interface 1/1/1
acc-01(config-if)# ip address 192.168.1.1/31
acc-01(config-if)# ip ospf 1 area 0
acc-01(config-if)# ip ospf network point-to-point
acc-01(config-if)# no shutdown
acc-01(config-if)# interface 1/1/2
acc-01(config-if)# ip address 192.168.2.1/31
acc-01(config-if)# ip ospf 1 area 0
acc-01(config-if)# ip ospf network point-to-point
acc-01(config-if)# no shutdown
Verify if the switches can see each other.
acc-01(config)# do ping 192.168.1.0
PING 192.168.1.0 (192.168.1.0) 100(128) bytes of data.
108 bytes from 192.168.1.0: icmp_seq=1 ttl=64 time=8.14 ms
108 bytes from 192.168.1.0: icmp_seq=2 ttl=64 time=14.3 ms

acc-01(config)# do ping 192.168.1.2
PING 192.168.1.2 (192.168.1.2) 100(128) bytes of data.
108 bytes from 192.168.1.2: icmp_seq=1 ttl=64 time=7.69 ms
108 bytes from 192.168.1.2: icmp_seq=2 ttl=64 time=6.32 ms
Alright. Now let’s check OSPF.
acc-01(config)# show ip ospf neighbors
VRF : default                          Process : 1
===================================================

Total Number of Neighbors : 2
Neighbor ID      Priority  State             Nbr Address       Interface
-------------------------------------------------------------------------
10.255.255.0     n/a       FULL              192.168.1.0        1/1/1
10.255.255.0     n/a       FULL              192.168.1.2        1/1/2
Great. Everything seems in order. Let’s continue with the configuration.
Next, we will set up VXLAN and the VLAN we want to use.
acc-01(config)# vlan 200
acc-01(config-vlan-200)# interface vxlan 1
acc-01(config-vxlan-if)# no shutdown
acc-01(config-vxlan-if)# source ip 10.255.255.2 # IP of the local loopback interface
acc-01(config-vxlan-if)# vni 200
acc-01(config-vni-200)# vlan 200
acc-01(config-vni-200)# vtep-peer 10.255.255.3  # IP of the second access switch loopback interface
OK. Now for the second switch.
acc-02
acc-02(config)# interface loopback 0
acc-02(config-loopback-if)# ip address 10.255.255.3
acc-02(config-loopback-if)# ip ospf 1 area 0
OSPF process does not exist.
Do you want to create (y/n)? y
OSPF Area is not configured.
Do you want to create (y/n)? y
acc-02(config-loopback-if)# interface 1/1/1
acc-02(config-if)# ip address 192.168.2.1/31
acc-02(config-if)# ip ospf 1 area 0
acc-02(config-if)# ip ospf network point-to-point
acc-02(config-if)# no shutdown
acc-02(config-if)# interface 1/1/2
acc-02(config-if)# ip address 192.168.2.3/31
acc-02(config-if)# ip ospf 1 area 0
acc-02(config-if)# ip ospf network point-to-point
acc-02(config-if)# no shutdown
acc-02(config-if)# vlan 200
acc-02(config-vlan-200)# interface vxlan 1
acc-02(config-vlan-200)# no shutdown
acc-02(config-vxlan-if)# source ip 10.255.255.3  ## IP of the local loopback interface
acc-02(config-vxlan-if)# vni 200
acc-02(config-vni-200)# vlan 200
acc-02(config-vni-200)# vtep-peer 10.255.255.2  # IP of the second access switch loopback interface
OK. That’s it. Let’s do the same tests.
First, we should verify if the access switches can see each other.
acc-01(config)# do ping 10.255.255.3
PING 10.255.255.3 (10.255.255.3) 100(128) bytes of data.
108 bytes from 10.255.255.3: icmp_seq=1 ttl=63 time=15.3 ms
108 bytes from 10.255.255.3: icmp_seq=2 ttl=63 time=13.7 ms
Next, we check the VXLAN interface status.
acc-01(config)# show interface vxlan
Interface vxlan1 is up
Admin state is up
Description:
Underlay VRF: default
Destination UDP port: 4789
VTEP source IPv4 address: 10.255.255.2

VNI        VLAN   VTEP Peers        Origin
---------- ------ ----------------- --------
200        200    10.255.255.3      static
Check if the red-marked parts are correct. The interface should be “up”. Also, we should see the correct IP addresses for the VTEP peer and source.
Testing the setup
If the setup looks correct, we can continue with the tests.
For this, we will configure 1 interface for our clients on each switch.
acc-01(config)# interface 1/1/7
acc-01(config-if)# no shutdown
acc-01(config-if)# no routing
acc-01(config-if)# vlan access 200
acc-02(config)# interface 1/1/7
acc-02(config)# no shutdown
acc-02(config)# no routing
acc-02(config)# vlan access 200
Next, we set up the clients. These are Ubuntu guests, so I will use “ifconfig” to set the IP address.
Client-1# ifconfig eth0 10.200.200.1/24
Client-2# ifconfig eth0 10.200.200.2/24
Ok. Now let’s try to ping.
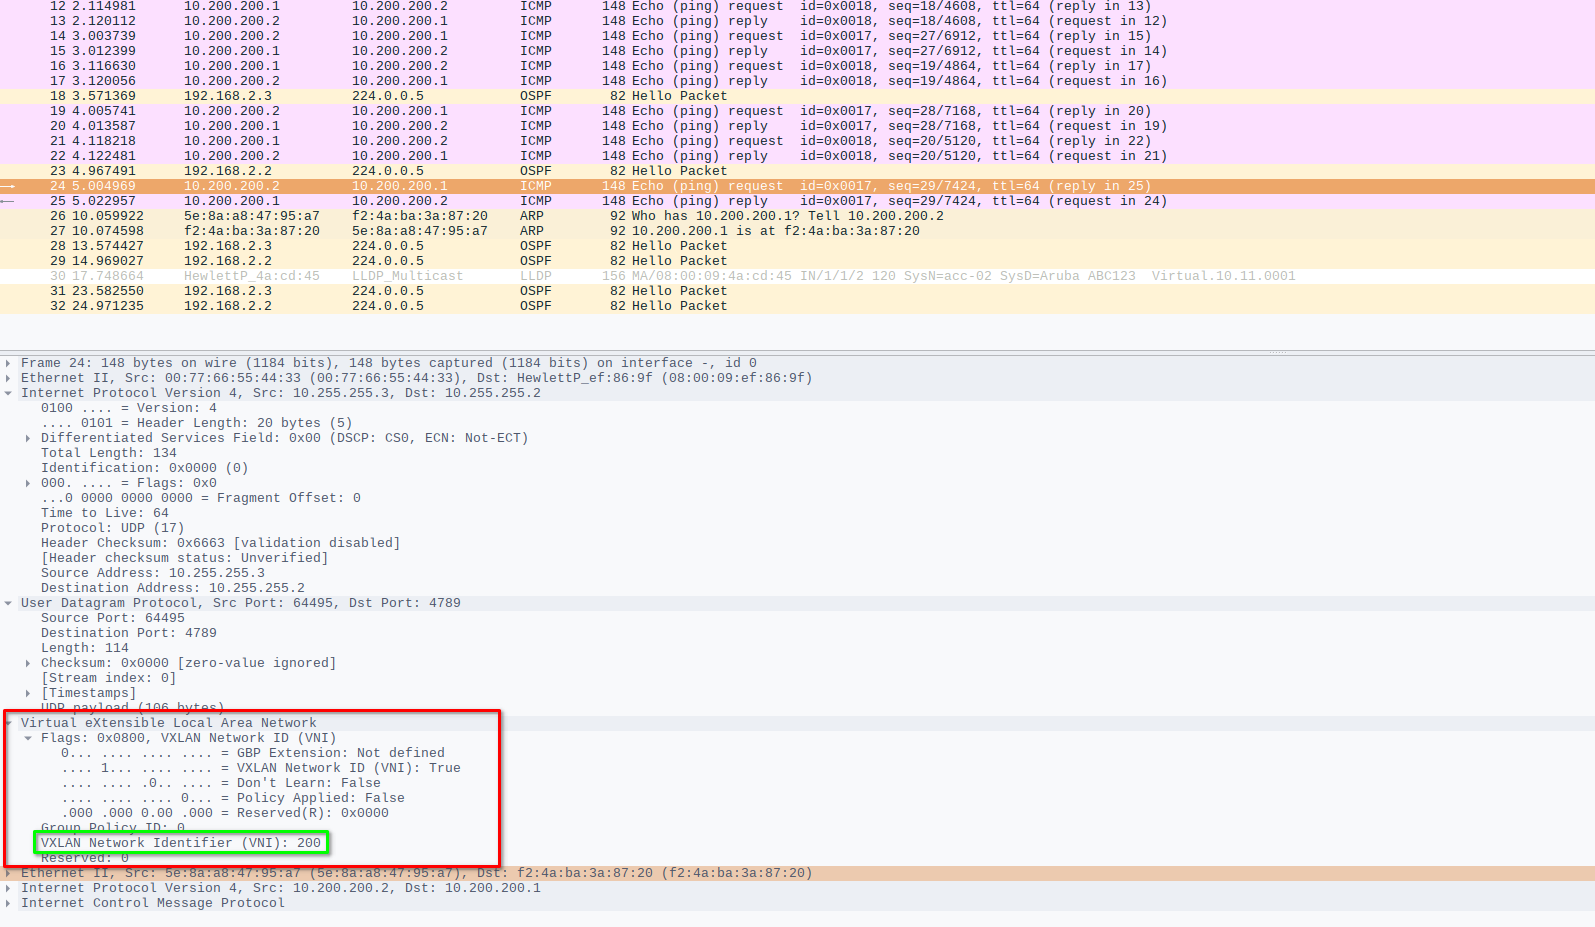
Client-1# ping 10.200.200.2
PING 10.200.200.2 (10.200.200.2) 56(84) bytes of data.
64 bytes from 10.200.200.2: icmp_seq=1 ttl=64 time=26.1 ms
64 bytes from 10.200.200.2: icmp_seq=2 ttl=64 time=15.1 ms
If we check Wireshark, we can see the VXLAN header.
Adding more switches
If you want to add additional switches as VXLAN Endpoints (VTEPs), configure another switch the same way as the access switches with OSPF and all.
In the VXLAN interface configuration you can add more than one “vtep-peer”.:
acc-01(config)# interface vxlan 1
acc-01(config-vxlan-if)# vni 200
acc-01(config-vni-200)# vtep-peer 10.255.255.x
If you want to carry another VLAN, you need to create an additional VNI and map that VLAN to that, since it is always a 1:1 mapping of VLAN to VNI.
acc-01(config)# vlan 300
acc-01(config)# interface vxlan 1
acc-01(config-vxlan-if)# vni 300
acc-01(config-vni-300)# vlan 300
acc-01(config-vni-300)# vtep-peer 10.255.255.3
acc-02(config)# vlan 300
acc-02(config)# interface vxlan 1
acc-02(config-vxlan-if)# vni 300
acc-02(config-vni-300)# vlan 300
acc-02(config-vni-300)# vtep-peer 10.255.255.2
That is it for the VXLAN configuration on ArubaOS-CX switches.
Till next time.