Take everything you read in this post with a grain of salt. My understanding concerning OSPF is very limited. So there could be some misinformation here.
I have been testing a few things in GNS3 over the weekend. One of which was OSPF between a Sophos XG and ArubaOS-CX. It didn’t really work for me at first and it took me a bit until I figured out, what the issue was.
So I want to make a guide on how to configure OSPF on a Sophos XG and ArubaOS-CX and write some of my thoughts down. I don’t know if any of this is the correct way to do it, but it worked for me. So it should be somewhat fine. Keep in mind that Sophos has an excellent guide on this, but I like to try things myself before I look them up.
By the way. The “issue” was, that I forgot to enable “Dynamic Routing” in the “Device access” tab. Always forgetting that part in the Sophos XG Firewall.
Let’s begin.
First, let me show you the topology. Nothing special but it always helps to have something visual I think.

Let’s start with the ArubaOS-CX configuration
ArubaOS-CX OSPF configuration
First I will create a loopback interface and assign an IP to it.
switch(config)# interface loopback 0
switch(config-loopback-if)# ip add 10.255.255.1/32
switch(config-loopback-if)# show interface loopback 0
Interface loopback0 is up
 Admin state is up
 VRF name is default
 Description:
 Hardware: Loopback, MAC Address: 08:00:09:3d:5c:7b
 IPv4 address 10.255.255.1/32
 MTU 1500
 Type --
 Full-duplex
 qos trust none
 Speed 0 Mb/s
 L3 Counters: Rx Disabled, Tx Disabled
 Auto-negotiation is off
 Flow-control: off
 Error-control: off
 MDI mode: none
switch(config-loopback-if)# exit
Ok, now let’s configure the interface, that’s connected to the Firewall.
switch(config)# interface 1/1/1
switch(config-if)# no shutdown
switch(config-if)# ip address 10.70.10.1/30
And enable OSPF on that interface. We will also configure “authentication”.
I will configure it as “simple-text”. You probably should not use this in production, since this is plaintext. I will show it in Wireshark later.
switch(config-if)# ip ospf 1 area 0
OSPF process does not exist.
Do you want to create (y/n)? y
OSPF Area is not configured.
Do you want to create (y/n)? y
switch(config-if)# ip ospf authenication simple-text
switch(config-if)# ip ospf authenication-key plaintext PASSWORD
Also add a couple of networks and make them available through OSPF. This is to have some information in the routing table.
switch(config-if)# interface 1/1/9
switch(config-if)# no shutdown
switch(config-if)# ip add 192.168.9.254/24
switch(config-if)# ip ospf 1 area 0

switch(config-if)# interface 1/1/8
switch(config-if)# no shutdown
switch(config-if)# ip add 192.168.8.254/24
switch(config-if)# ip ospf 1 area 0
This is a very basic configuration but should already work. Let’s configure the Sophos XG.
Sophos XG base configuration
I will skip the initial configuration.
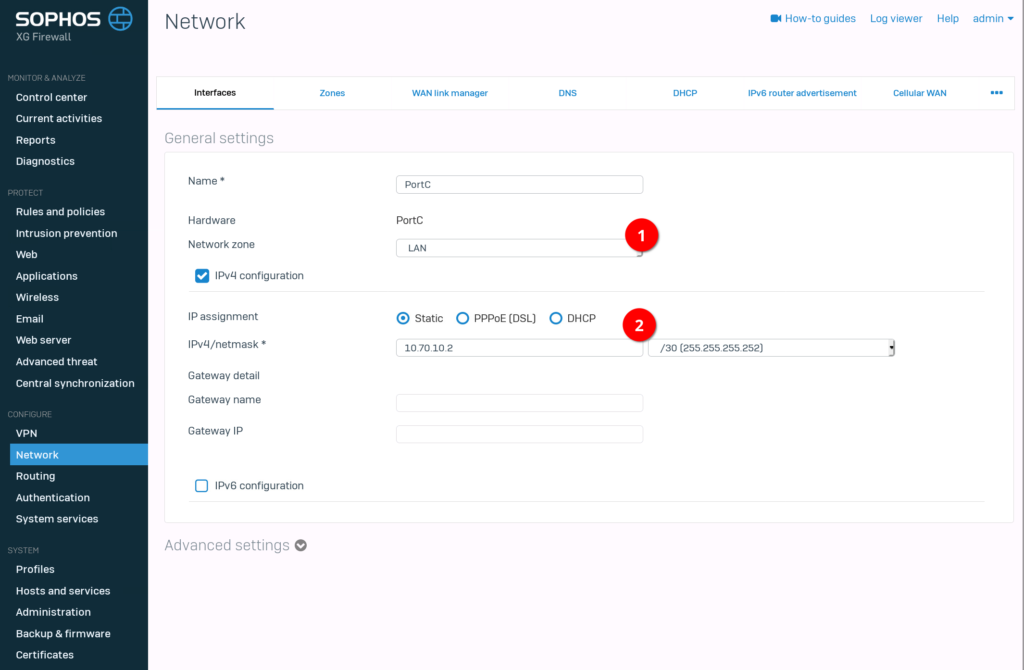
First things first. We need to configure the interface which is attached to the ArubaOS-CX Switch.


Now we have to enable “Dynamic Routing” in the “Device access” menu. This took me an eternity to figure out 🙂 . Always forgetting this change from the SG Series.

Sophos XG OSPF configuration
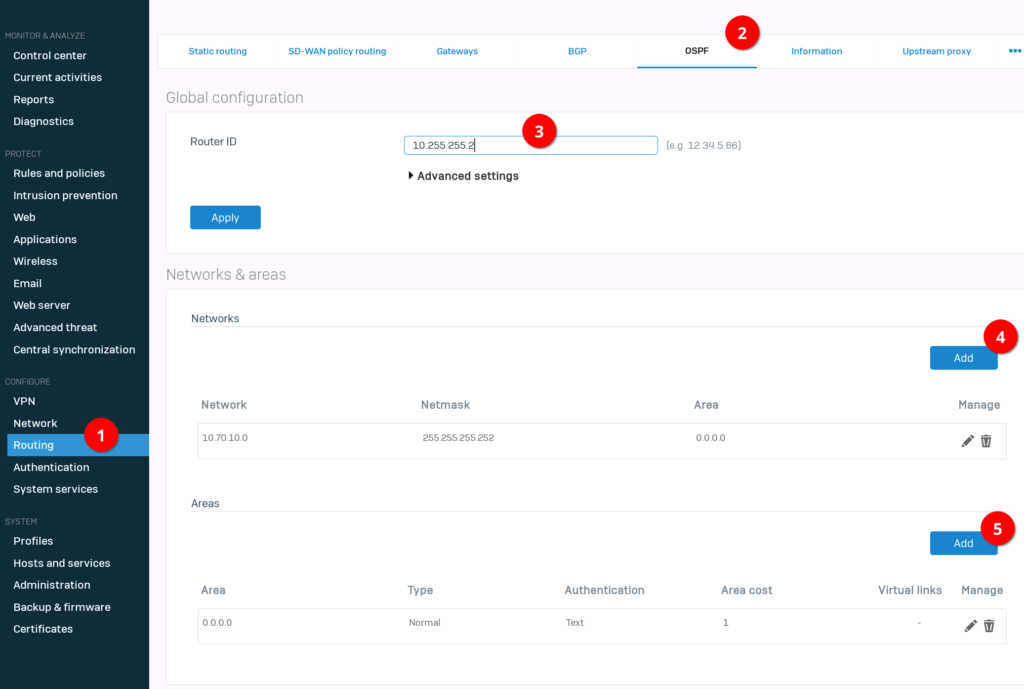
Ok, that was it for the preparation. Now we can configure OSPF. Assign a “router ID”, set the “network” and “areas”. In the area settings, we enable “Authentication”. For this, we need to select “Text” since we are using “plaintext” on Aruba. By the way. If you don’t want to use authentication at all, just skip the “Area” (5) steps.

Last step. Change the “Authentication” setting for the attached interface to “Text” and type in a password. You can do this with the “Override interface configuration” setting.

(Alternative) Configure Sophos XG OSPF via the CLI
Connect to the device through SSH.
Select 3. Route Configuration -> 1. Configure Unicast Routing -> 2. Configure OSPF
// Configure OSPF
ospf> enable
ospf# configure terminal
ospf(config)# router ospf
ospf(config-router)# ospf router-id 10.255.255.2
ospf(config-router)# network 10.70.10.0/30 area 0.0.0.0
ospf(config-router)# network 172.16.16.0/24 area 0.0.0.0
ospf(config-router)# area 0.0.0.0 authentication
ospf(config-router)# exit
ospf(config)# exit
// Configure the interface
ospf(config)# interface PortC
ospf(config-if)# ip ospf authentication
ospf(config-if)# ip ospf authentication-key PASSWORD
That’s it.
Taking a look at the information
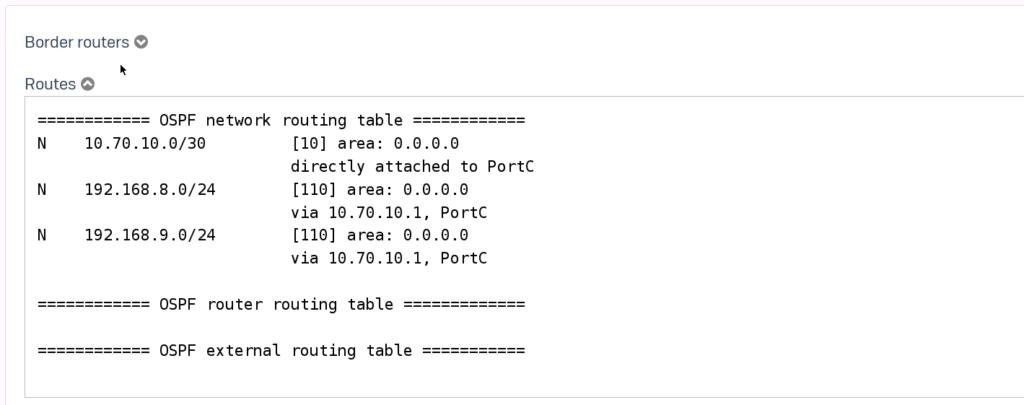
By now the routing table should have filled up.

Here is the neighbour information.

Ok, now let’s take a look at the ArubaOS-CX logs.
We can see at the bottom that the system goes through the steps of Initiating to Full
core hpe-routing[3667]: Event|2401|LOG_INFO|AMM|1/1|AdjChg: Nbr  rtr ID 10.255.255.2 on IP addr 10.70.10.1( area ID 0.0.0.0): Loading -> Full
core hpe-routing[3667]: Event|2401|LOG_INFO|AMM|1/1|AdjChg: Nbr  rtr ID 10.255.255.2 on IP addr 10.70.10.1( area ID 0.0.0.0): Exchange -> Loading
core hpe-routing[3667]: Event|2401|LOG_INFO|AMM|1/1|AdjChg: Nbr  rtr ID 10.255.255.2 on IP addr 10.70.10.1( area ID 0.0.0.0): Exstart -> Exchange
core hpe-routing[3667]: Event|2401|LOG_INFO|AMM|1/1|AdjChg: Nbr  rtr ID 10.255.255.2 on IP addr 10.70.10.1( area ID 0.0.0.0): Two-way -> Exstart
core hpe-routing[3667]: Event|2402|LOG_INFO|AMM|1/1|Interface IP addr 10.70.10.1( area ID 0.0.0.0) changed from Waiting to BDR, input: IF_BACKUP_LOCAL
core hpe-routing[3667]: Event|2401|LOG_INFO|AMM|1/1|AdjChg: Nbr  rtr ID 10.255.255.2 on IP addr 10.70.10.1( area ID 0.0.0.0): Init -> Two-way
core hpe-routing[3667]: Event|2401|LOG_INFO|AMM|1/1|AdjChg: Nbr  rtr ID 10.255.255.2 on IP addr 10.70.10.1( area ID 0.0.0.0): Down -> Init
core hpe-routing[3667]: Event|2402|LOG_INFO|AMM|1/1|Interface IP addr 10.70.10.1( area ID 0.0.0.0) changed from Down to Waiting, input: IF_ELIG_BCAST_UP
core hpe-routing[3667]: Event|2402|LOG_INFO|AMM|1/1|Interface IP addr 10.70.10.1( area ID 0.0.0.0) changed from Point to point to Down, input: IF_INTERFACE_DOWN
core hpe-routing[3667]: Event|2401|LOG_INFO|AMM|1/1|AdjChg: Nbr  rtr ID 10.255.255.2 on IP addr 10.70.10.1( area ID 0.0.0.0): Full -> Down
core hpe-routing[3667]: Event|2401|LOG_INFO|AMM|1/1|AdjChg: Nbr  rtr ID 10.255.255.2 on IP addr 10.70.10.1( area ID 0.0.0.0): Loading -> Full
core hpe-routing[3667]: Event|2401|LOG_INFO|AMM|1/1|AdjChg: Nbr  rtr ID 10.255.255.2 on IP addr 10.70.10.1( area ID 0.0.0.0): Exchange -> Loading
core hpe-routing[3667]: Event|2401|LOG_INFO|AMM|1/1|AdjChg: Nbr  rtr ID 10.255.255.2 on IP addr 10.70.10.1( area ID 0.0.0.0): Exstart -> Exchange
core hpe-routing[3667]: Event|2401|LOG_INFO|AMM|1/1|AdjChg: Nbr  rtr ID 10.255.255.2 on IP addr 10.70.10.1( area ID 0.0.0.0): Two-way -> Exstart
core hpe-routing[3667]: Event|2401|LOG_INFO|AMM|1/1|AdjChg: Nbr  rtr ID 10.255.255.2 on IP addr 10.70.10.1( area ID 0.0.0.0): Init -> Two-way
core hpe-routing[3667]: Event|2401|LOG_INFO|AMM|1/1|AdjChg: Nbr  rtr ID 10.255.255.2 on IP addr 10.70.10.1( area ID 0.0.0.0): Down -> Init
Authentication Types
MD5 Authentication
Let’s change the authentication setting to MD5.
// Sophos XG
ospf(config)# interface PortC
ospf(config-if)# ip ospf authentication message-digest
ospf(config-if)# ip ospf message-digest-key 1 md5 PASSWORD
// Aruba
switch(config)# interface 1/1/1
switch(config-if)# ip ospf authentication message-digest
switch(config-if)# ip ospf message-digest-key 1 md5 plaintext PASSWORD
No Authentication
And here is how you remove authentication if you set it before.
// Sophos XG
ospf(config)# interface PortC
ospf(config-if)# ip ospf authentication null
ospf(config-if)# no ip ospf message-digest-key 1
// Aruba
switch(config)# interface 1/1/1
switch(config-if)# no ip ospf authentication
switch(config-if)# no ip ospf message-digest-key 1
(Optional) Wireshark and Point-to-Point Network type
We are actually done. OSPF should work at this point. Here I want to take a look at the Wireshark output. The network types, I don’t understand fully.
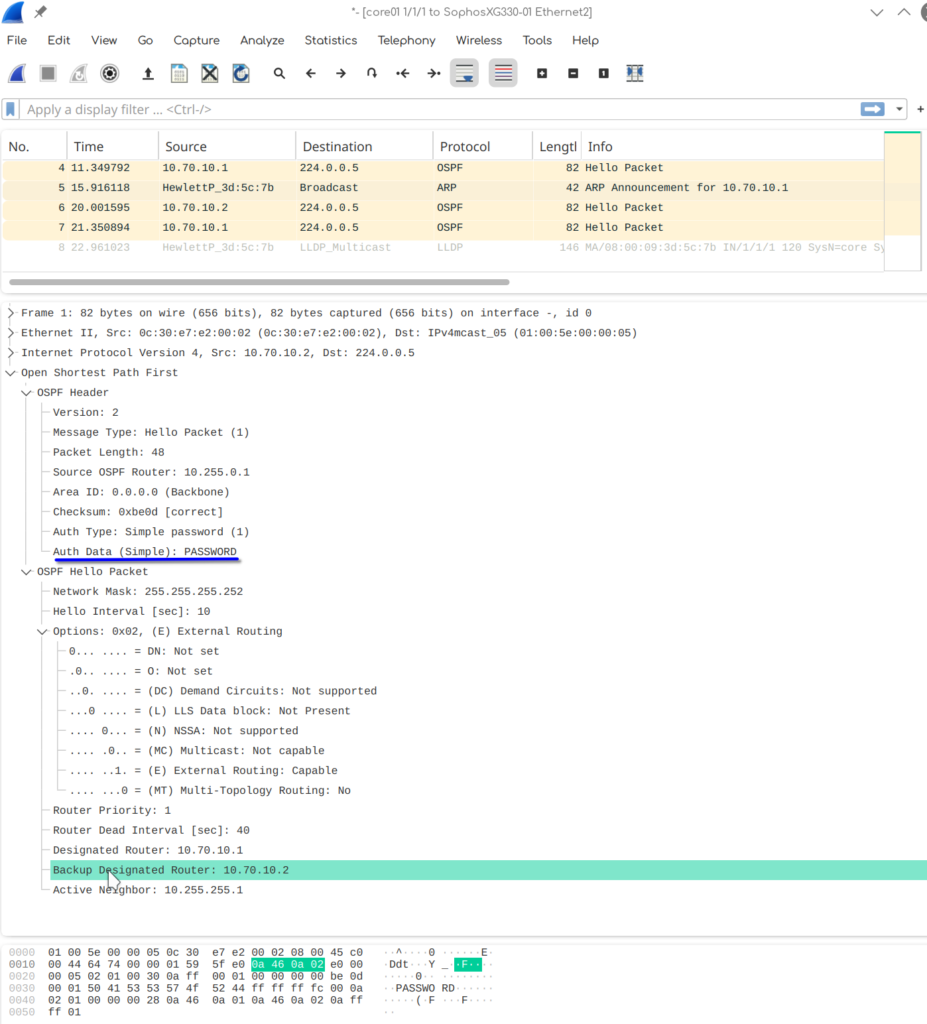
GNS3 allows us to follow the traffic on a link. Right-click on a link and select “Start Wireshark”.
The blue underline is the plaintext password. That’s why you shouldn’t use plaintext authentication in production. MD5 isn’t exactly secure but still better than this.
Right above that is the Authentication Type we used, simple text / simple password in our case.
At the bottom we have the IPs of the “Designated Router”, the “Backup Designated Router” and the “Active Neighbor IP”.
Concerning the “Designated Router” election. The way I understand it is, that there are two factors that decide which of the routers will be the “Designated Router”. The “Router-ID” and the “Router Priority”. The default priority is always 1. So the device with the highest router-id wins.

This is a working configuration. Now I want to change the network type from “broadcast” to “point-to-point” on the Aruba Switch.
switch(config)# interface 1/1/1
switch(config-if)# ip ospf network point-to-point
And here is a comparison of the OSPF packages. The only difference I can see is the “Designated Router” and “Backup Designated Router”. I guess since a point-to-point network does not use the concept of “Designated Routers”, it’s left blank. I don’t know if there is another way to differentiate the network types in OSPF.

Let us take a last look at the ArubaOS-CX logs.
core hpe-routing[3667]: Event|2401|LOG_INFO|AMM|1/1|AdjChg: Nbr  rtr ID 10.255.255.2 on IP addr 10.70.10.1( area ID 0.0.0.0): Loading -> Full
core hpe-routing[3667]: Event|2401|LOG_INFO|AMM|1/1|AdjChg: Nbr  rtr ID 10.255.255.2 on IP addr 10.70.10.1( area ID 0.0.0.0): Exchange -> Loading
core hpe-routing[3667]: Event|2401|LOG_INFO|AMM|1/1|AdjChg: Nbr  rtr ID 10.255.255.2 on IP addr 10.70.10.1( area ID 0.0.0.0): Exstart -> Exchange
core hpe-routing[3667]: Event|2401|LOG_INFO|AMM|1/1|AdjChg: Nbr  rtr ID 10.255.255.2 on IP addr 10.70.10.1( area ID 0.0.0.0): Two-way -> Exstart
core hpe-routing[3667]: Event|2401|LOG_INFO|AMM|1/1|AdjChg: Nbr  rtr ID 10.255.255.2 on IP addr 10.70.10.1( area ID 0.0.0.0): Init -> Two-way
core hpe-routing[3667]: Event|2401|LOG_INFO|AMM|1/1|AdjChg: Nbr  rtr ID 10.255.255.2 on IP addr 10.70.10.1( area ID 0.0.0.0): Down -> Init
core hpe-routing[3667]: Event|2402|LOG_INFO|AMM|1/1|Interface IP addr 10.70.10.1( area ID 0.0.0.0) changed from Down to Point to point, input: IF_NON_BCAST_UP
core hpe-routing[3667]: Event|2402|LOG_INFO|AMM|1/1|Interface IP addr 10.70.10.1( area ID 0.0.0.0) changed from Other DR to Down, input: IF_INTERFACE_DOWN
core hpe-routing[3667]: Event|2402|LOG_INFO|AMM|1/1|Interface IP addr 10.70.10.1( area ID 0.0.0.0) changed from BDR to Other DR, input: IF_DR_OTHER
core hpe-routing[3667]: Event|2401|LOG_INFO|AMM|1/1|AdjChg: Nbr  rtr ID 10.255.255.2 on IP addr 10.70.10.1( area ID 0.0.0.0): Full -> Down
After going to a “down” state the connection switches back to a “Full” state. But if we take a look at the routing table, we can see that no routes have been populated.

This one I actually don’t get. It goes through the whole process of establishing a connection but can’t populate the routing table? Why does it establish in the first place? I understand that there are possible combinations between network types that work, but I thought if it wasn’t compatible it wouldn’t establish a connection.
I will have to look into this some other time.
(Bonus) Change network type on Sophos XG over CLI
We can change the Sophos XG OSPF network type via the CLI. Don’t know if it’s possible via the WebUI.
ospf(config)# interface PortC
ospf(config-if)# ip ospf network point-to-point