- Sophos XGS 2300 and Sophos Firewall base configuration (Part 1)
- Sophos Firewall SSL VPN / IPSec VPN configuration (Part 2)
- Sophos Firewall HA cluster configuration (Part 3)
Hey there.
Let’s continue with the Sophos XGS setup. If you missed part 1, you can either use this link or the button up top.
This will be a longer post, so just pick a topic from the table above, if you are looking for something specific.
Here again, the topology.

Remote access VPN
Authentication Server (Active Directory)
We will add an authentication server first. This allows us to use our centralized directory server, Windows Active Directory in this case, for the VPN authentication. We could also use local users if we don’t need or have a centralized system.
Navigate to “Authentication” -> “Servers” and click on “Add”.
Select the “Server Type” (Active Directory) and enter the name and IP of the server. For the “connection security” I will choose “Plaintext”. You should use SSL/TLS or STARTTLS in a productive environment, but for this to work, you need a certificate authority in your domain (if I’m not mistaken).
For now, we will continue with “Plaintext”.
We can leave the “port” at its default 389. Set the “NetBIOS domain”. This is usually the first part of your domain in all capital letters, so in my case, it would be “RANDOM-IT-BLOG”.
Next, enter the “ADS user name” and the user password. I created a user named “sophos” for this, which doesn’t need administrative rights. Leave “Email address attribute” at its default.
Now enter the “domain name” and “search queries”. For example.
DC=random-it-blog,DC=de
Make sure that you select an OU with at least one group in it. Something like “Sophos-VPN” for instance, since we are actually importing groups, not users.
Once that’s done, you can test the connection via the “Test connection” button at the bottom. If everything works, click on “Save”.
- Server type: Active Directory
- Server name: AD01
- Server IP/domain: 172.24.1.10
- Connection security: Plaintext
- NetBIOS domain: RANDOM-IT-BLOG
- ADS user name: sophos
- Password: <secure password>
- Domain name: random-it-blog.de
- Search queries: DC=random-it-blog,DC=de


Where to find the distinguished name in the AD
Here is a quick guide on how to find the path for the “search queries”.
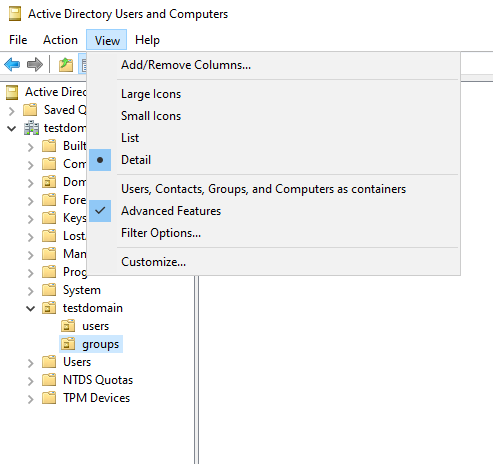
On the Active Directory server, open “Active Directory Users and Computers” and make sure that the “Advanced Features” is enabled under “View”.
Next, navigate to the OU you want the distinguished name for. Right click -> properties. Select “Attribute Editor” and search for the “distinguishedName” entry. Here you can find the entry for the “search queries” in Sophos.


Import Groups
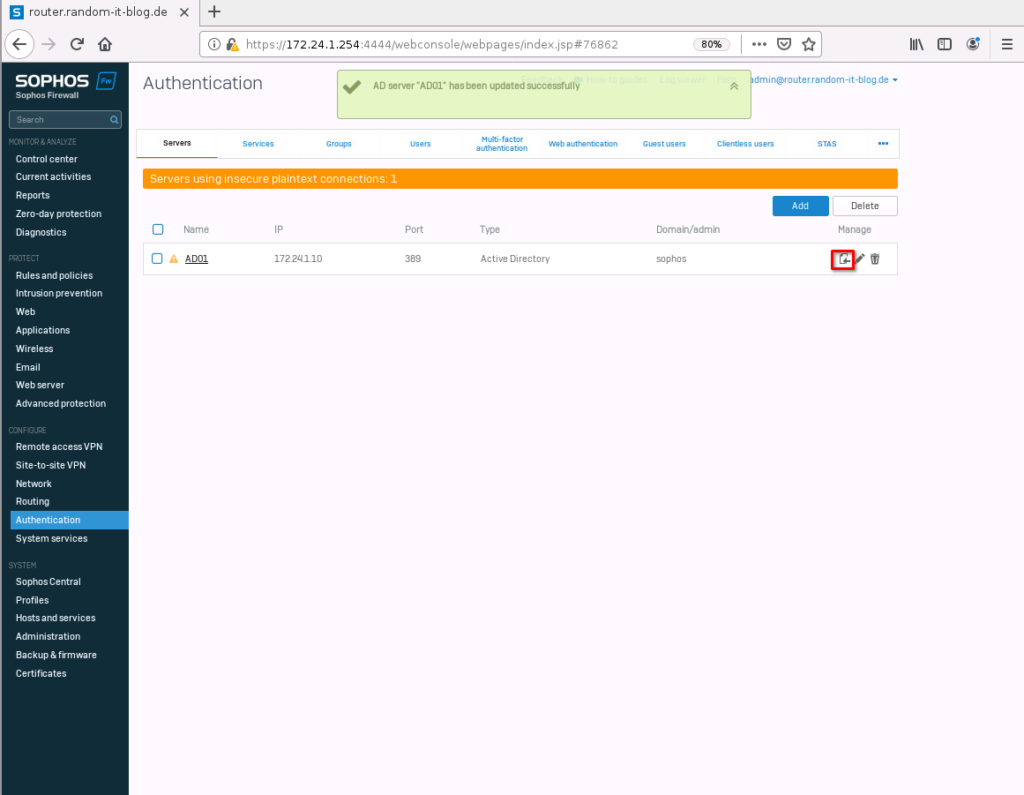
Now that we have the authentication server, we want to import the groups from the AD (Active Directory). For this, click on the tiny “import” button on the right of the authentication server entry.
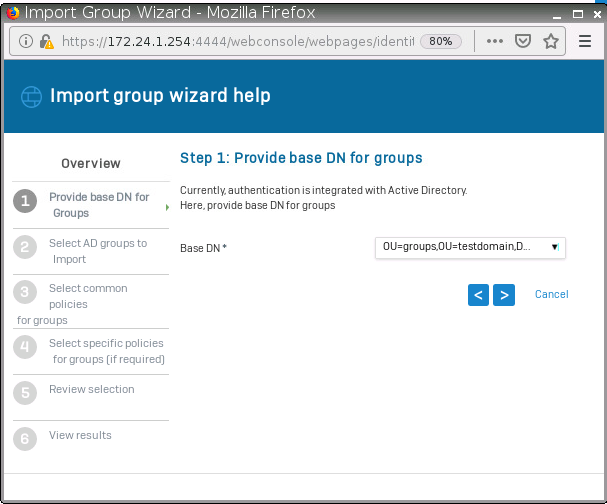
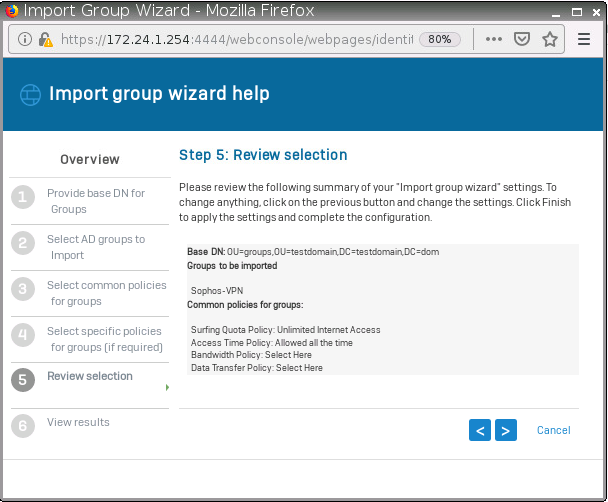
Click on “Start” and select the base DN. After that select either the OU if you want to import everything or just the group.
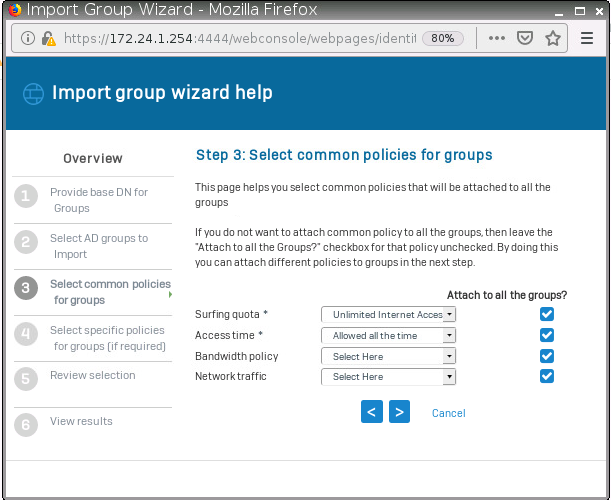
In Step 3 we can set policies for the groups. I will leave it in the default setting. Click on next and “Close”.



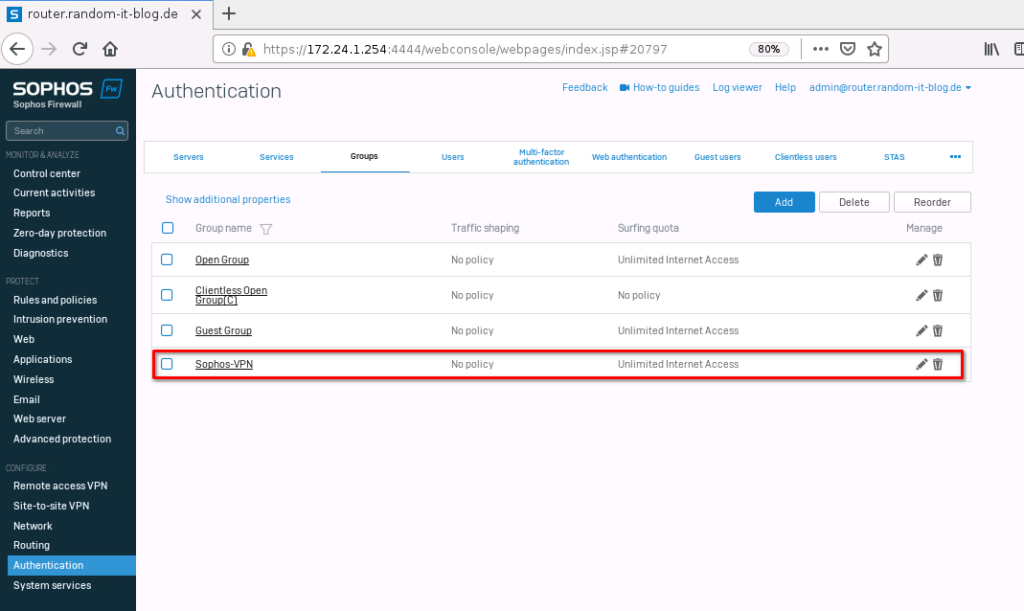
Navigate to “groups”, now the AD group should show up.
Set Authentication Services
To be able to use the newly added authentication server, we need to add it to the authentication methods for the different services.
Switch to the tab “Services”, where you can add the new server to the list, by selecting it from the left pane. Add it to the “firewall authentication methods” by selecting the new server. Scroll down until you see “SSL VPN authentication methods” and either select “Same as firewall” or add the new server.


Setup SSL VPN
The preparations are done. Now we can set up SSL VPN.
Go to “Remote access VPN” and select “SSL VPN”.
Click on “SSL VPN global settings” to change a few settings first.

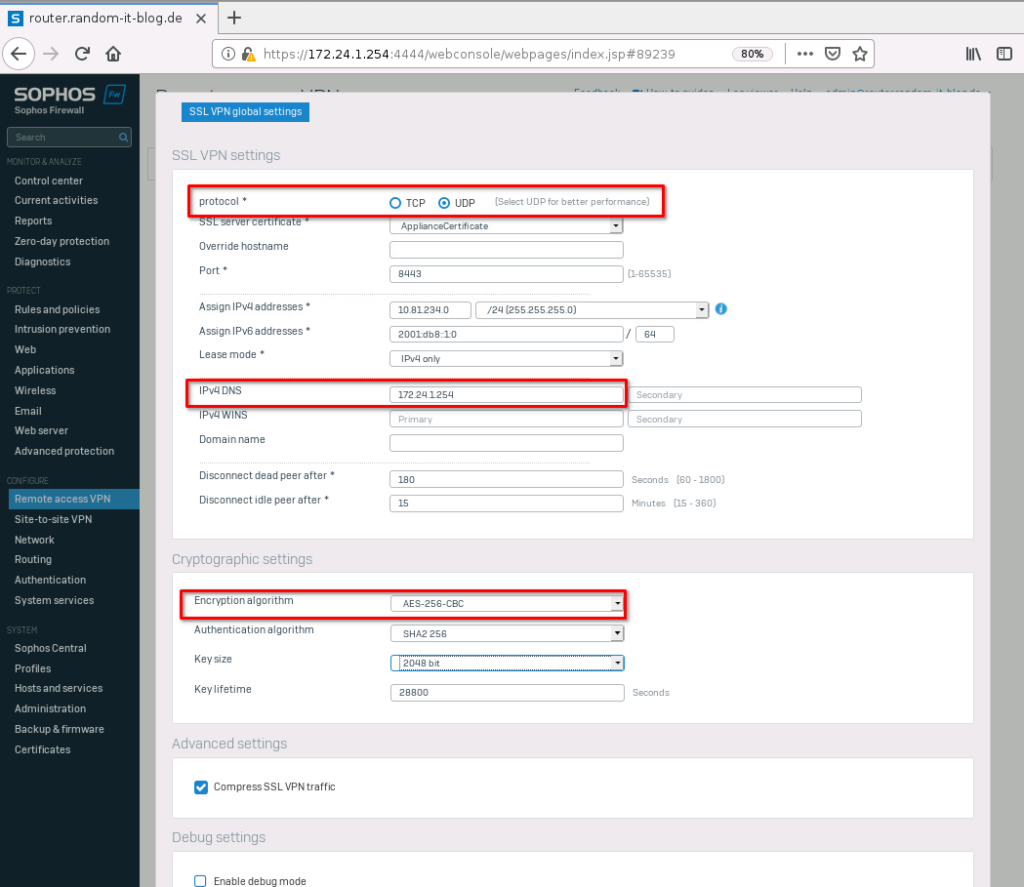
First, take a note of the “Assign IPv4 addresses” network for later. We will use it in the firewall rule.
I tend to switch to “UDP” for the protocol. Also, we should set an “IPv4 DNS” and change the “Encryption algorithm” to something higher. I choose “AES-256-CBC”. Apply the settings and select “Add”.
- Protocol: UDP
- IPv4 DNS: 172.24.1.254
- Encryption algorithm: AES-256-CBC
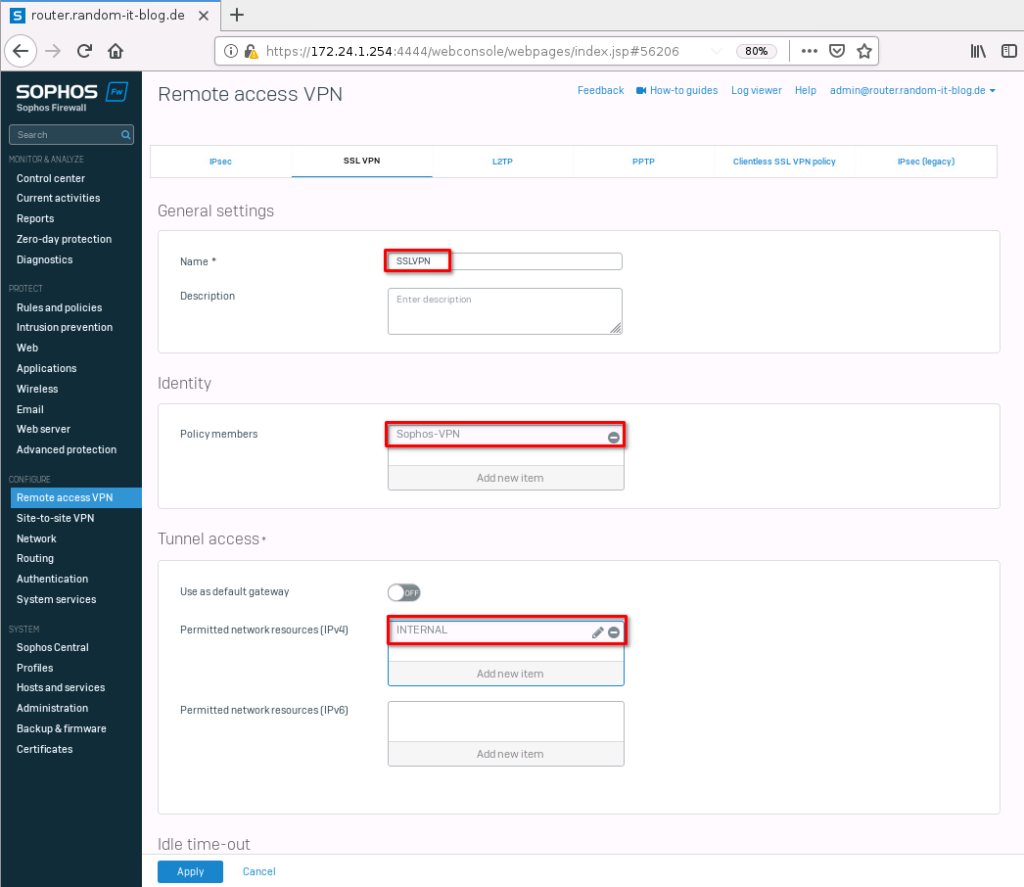
Give the new configuration a name, select the group we just added under “policy members” and the network we want to grant access to. “INTERNAL” in my case. Apply the settings to finish the setup.
- Name: SSLVPN
- Policy members: Sophos-VPN
- Permitted network resources (IPv4): INTERNAL (172.24.1.0/24)
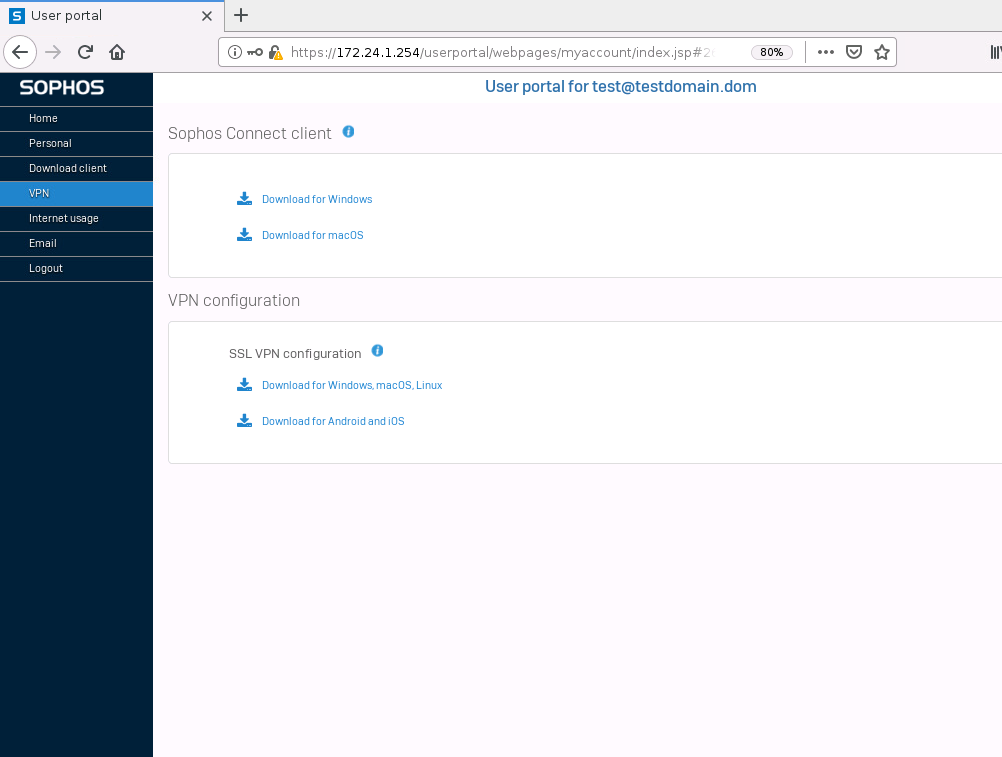
To download the user configuration (certificate and VPN config), open a new private window in your browser and enter the URL of your Sophos without port 4444. In my case “https://172.24.1.254”.
This should open the user portal, where you can log in with a domain user and download the configuration file.

SSL VPN Firewall Rule
We will also need to add a firewall rule. Otherwise, the users won’t be able to access anything.
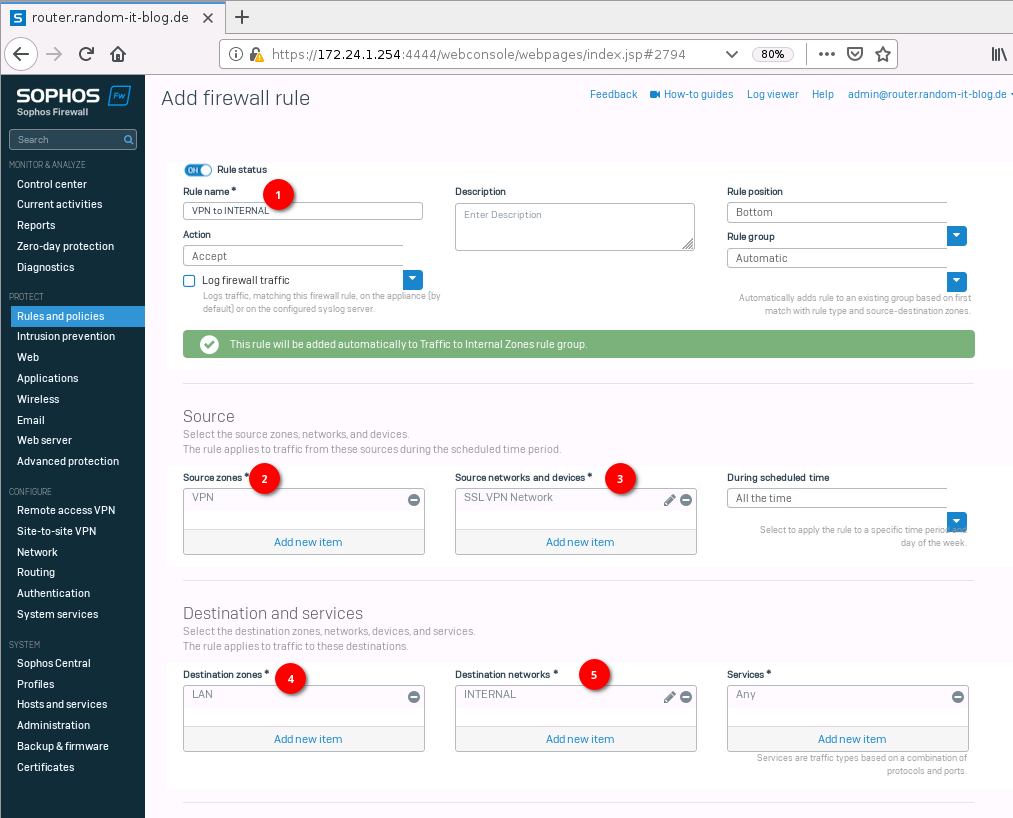
Navigate to “Rules and Policies” -> “Firewall rules” and create a new rule. This is basically the same as the “Webbrowsing” rule we created in part 1. Select “VPN” for the zone, and for the source, network create a new object for the SSL VPN network. We will use the network we grabbed from the SSL VPN settings. The destination zone we set to “LAN” and destination network “INTERNAL”.
For the “Services” you can limit it to specific ports or leave it as “any”. This time we will leave the “Web filtering” empty.
- Rule name: VPN to INTERNAL
- Source zone: VPN
- Source network and devices: SSL VPN Network
- Destination zones: LAN
- Destination networks: INTERNAL
- Services: Any
IPSec
That was it for the SSL VPN configuration. For IPSec, the steps are mostly the same. Navigate to “Remote access VPN” -> “IPSec”. Select “Enable” next to “IPSec remote access”. Choose the interface you want to connect to.
The default profile is fine.
Type in a secure “Preshared key” and leave “Local ID” and “Remote ID” blank. Under “Allowed users and groups” we can choose the newly imported group.
Give it a pretty name, assign an IP range and the DNS server for the IPSec clients.
If you want to route all of the traffic through your VPN tunnel, leave the “use as default gateway” as is. I don’t like that because it clogs the internet bandwidth with useless traffic, so I will disable it. Add the INTERNAL network to the permitted networks (in case you deselect the default gateway) and apply the configuration.
- Interface: WAN
- Authentication type: Preshared key
- Preshared key: <secure key>
- Allowed users and groups: Sophos-VPN
- Name: ipsec_client
- Assign IP from: 10.255.55.10 – 10.255.55.100
- DNS Server: 172.24.1.254
- Use as default gateway: off
- Permitted network resources: INTERNAL (172.24.1.0/24)

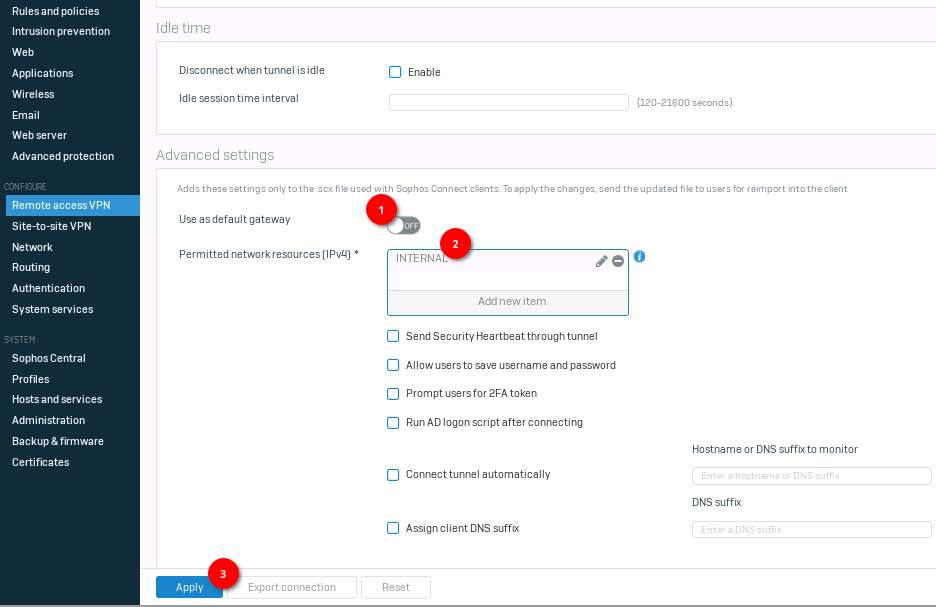
We can also export the configuration on the same page, with the “Export connection” button.
Do not forget to create a firewall rule for this as well.
Site-to-Site VPN Configuration
Let’s expand the topology a bit.

I deployed a second Sophos called “Sophos-branch” in a new network, which I will call “INTERNAL-BRANCH”. This one is set up to be able to access the test network. We will set up a site-to-site VPN between these two firewalls using SSL VPN and IPSec. I also renamed the other firewall to “Sophos-HQ”.
Let’s begin with the initial steps.
Check reachability (Ping)
First, we will check if the firewalls can ping each other.
Go to “Diagnostics” -> “Tools” and type in the public IP of the other firewall. I will do this from the “Sophos-Branch”.


The ping failed.
This is because of the default setting which drops ICMP packages. We have to allow ICMP under “Device access” first.
On the Sophos-HQ, navigate to “Administration” -> “Device access” and enable “Ping/Ping6” for the WAN Zone.
Also while we are at it, enable “SSL VPN” on the WAN zone. We need this for the site-to-site SSL VPN.

If we try to ping again, it should work.

Do the same configuration on the Sophos-Branch.
Great. We know that the firewalls can reach each other, let’s start with the site-to-site setup.
Site-to-Site VPN (SSL VPN)
On the “Sophos-HQ” firewall select “Site-to-Site VPN” -> “SSL VPN”.
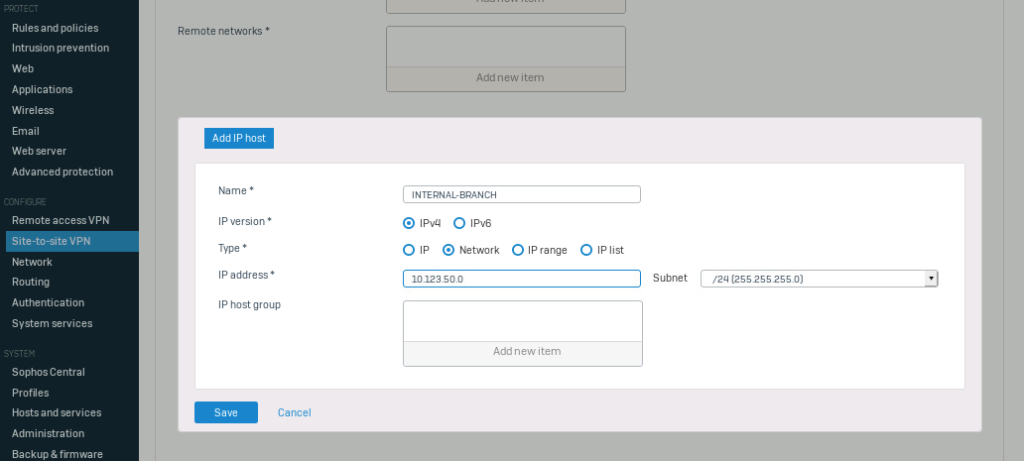
Click on “Add” under the Server tab and type in a name for the connection. Select the internal network you want to share. “INTERNAL” in my case. Under “remote networks” click on “add” to create a new object, I will call this “INTERNAL-BRANCH” and enter the network of the branch office (10.123.50.0/24).
Save the configuration.


On the same page, we can export the configuration. Click on “download” on the right side of the new entry.
This should download a *.apc file.

Once you have the file, we can import it into the branch firewall.
Select “Site-to-Site VPN” -> “SSL VPN” on “Sophos-Branch” and click on “Add” under “Client”.
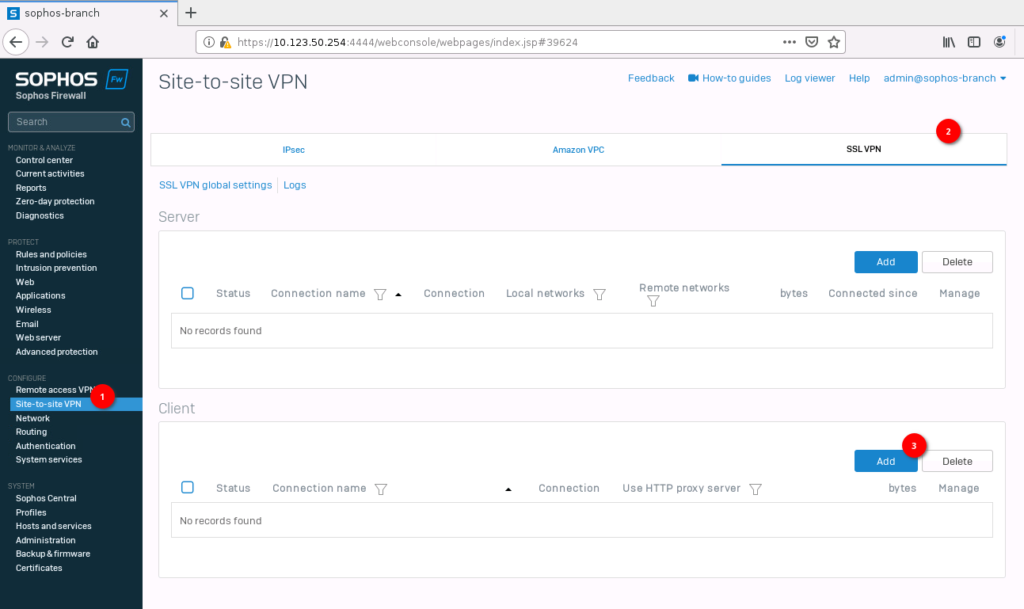
Give it a name and select the configuration file with the “Browse…” button.
With the override peer hostname, you could also specify the public IP or publicly reachable FQDN.
Click on “Save” to apply to configuration.

If everything worked, you should see a new entry with a green circle.

Site-to-Site Firewall Rule (SSL VPN)
Now we have to create a firewall rule on both switches, to allow traffic between the networks.
Start with the Sophos-HQ. Go to “Rules and policies” -> “Firewall rules” and add a new rule.
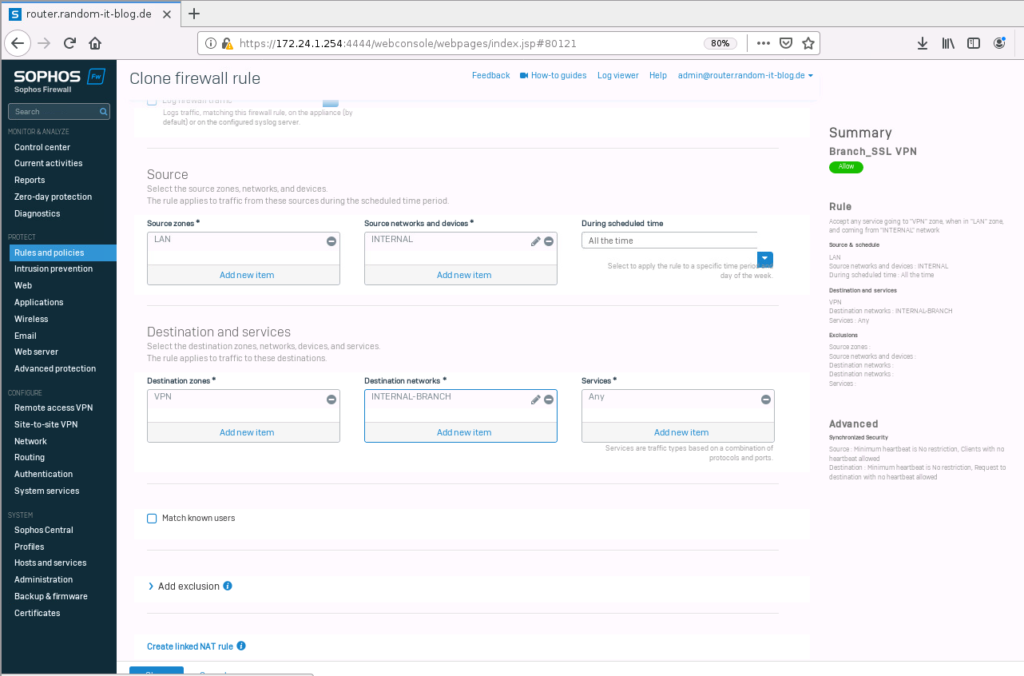
For this, we want to allow traffic from the “VPN” zone and the “source network” “INTERNAL-BRANCH (10.123.50.0/24)” to the “LAN” zone and the “INTERNAL (172.24.1.0/24)” “destination network”. We will leave the “Services at “any”.
Save the configuration.
Sophos-HQ:
- Rule name: SSL VPN
- Source zone: VPN
- Source networks and devices: INTERNAL-BRANCH (10.123.50.0/24)
- Destination zone: LAN
- Destination networks: INTERNAL (172.24.1.0/24)

Next is the firewall rule on “Sophos-Branch”. The Zone is “LAN”, source network is “INTERNAL-BRANCH (10.123.50.0/24)”, the destination zone is “VPN” and the destination network is “INTERNAL-HQ (172.24.1.0/24)”. Again, we leave services at “any”.
Sophos-Branch:
- Name: HQ-SSL-VPN
- Source zone: LAN
- Source networks and devices: INTERNAL-BRANCH (10.123.50.0/24)
- Destination zone: VPN
- Destination networks: INTERNAL-HQ (172.24.1.0/24)

To test it, I will ping from a client in the branch network (10.123.50.1). to a client in the HQ network (172.24.1.2).

As you can see we can ping from the branch client to the HQ client, but not in the other direction. This is because we only allowed traffic in one direction (from Branch to HQ). To resolve this, we have to create another rule, allowing traffic from the HQ network to the Branch network.
Below are two examples.
Sophos-Branch

Sophos-HQ
Ok. Last on the list. IPSec Site-to-Site. Let’s begin.
Site-to-Site VPN (IPSec)
We will start on the Sophos-HQ firewall, but because I want to use RSA keys we have to set up the Sophos-Branch in parallel. It should be clearer once we start.
If you follow the whole guide, then make sure to disable the Site-to-Site SSL VPN before continuing. It could interfere with the IPsec configuration since we are using the same networks.
Navigate to “Site-to-Site” -> “IPsec” and click on “Add”.
Give it a name, I will use “Sophos_Branch”, and select “respond only” as a Gateway type. We could also use “initiate the connection”. At least one side (or both) has to have the “initiate” setting enabled. While we are at it, enable the “Activate on save” on the top right.
Next, select “RSA key” as the “Authentication Type” and copy the “local RSA key” from the little window. We will need this for the “Sophos-Branch” firewall.
Under “Gateway settings”, set the “listening interface” to the WAN interface and Gateway address to the public IP of the branch firewall.
Once you scroll down a bit, you should see “local subnet” and “remote subnet”. For the local subnet, select “INTERNAL (172.24.1.0/24)” and “INTERNAL-BRANCH (10.123.50.0/24)” for the remote subnet.
Do not click on Save yet, because we have to get the RSA key from the branch firewall.
- Name: Sophos_Branch
- Gateway type: Respond only
- Authentication type: RSA key (Paste RSA key from Sophos-Branch)
- Listening interface: PortB – 102.120.90.81
- Gateway address: 55.102.22.1
- Local subnet: INTERNAL (172.24.1.0/24)
- Remote subnet: INTERNAL-BRANCH (10.123.50.0/24)
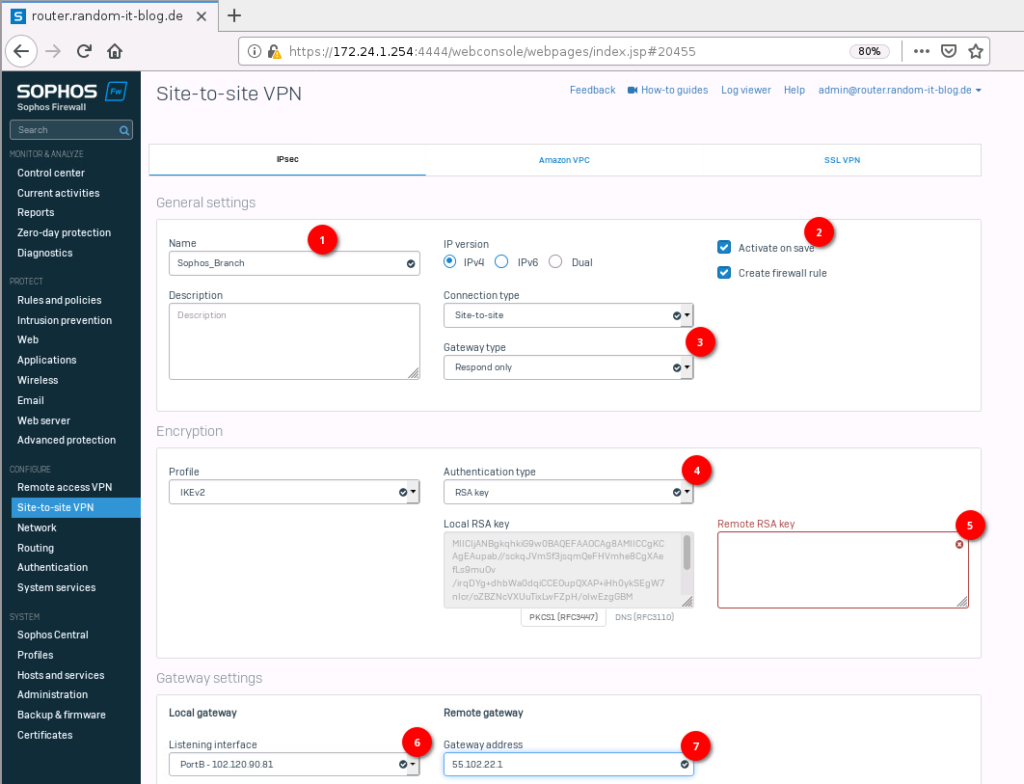
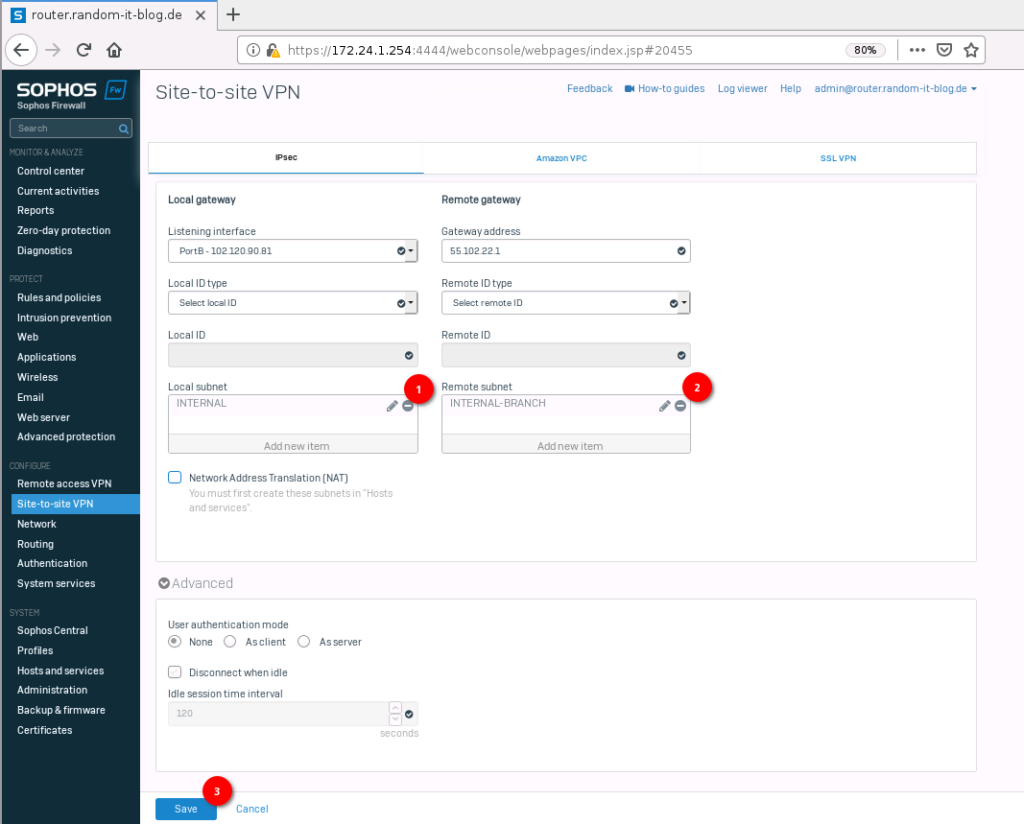
On the Sophos-Branch, the settings are mostly the same. Remember to enable the “activate on save”.
Paste the RSA key from the HQ firewall to the “Remote RSA key” and copy / paste the “local RSA key” from the branch to the HQ firewall.
The rest is very similar, just reverse the local and remote networks/IPs.
- Name: Sophos_HQ
- Gateway type: Initiate the connection
- Authentication Type: RSA key (Paste RSA key from Sophos-HQ)
- Listening Interface: PortB – 55.102.22.1
- Gateway address: 102.120.90.81
- local subnet: INTERNAL-BRANCH (10.123.50.0/24)
- remote subnet: INTERNAL-HQ (172.24.1.0/24)


Click on save on both firewalls.
The connection should establish. In case you forgot to activate the connection on save, you can click on the tiny button below the “Active” title.
The firewall rules are set automatically. If you disabled that then the rules are identical to those for the site-to-site SSL VPN. Just recreate them.
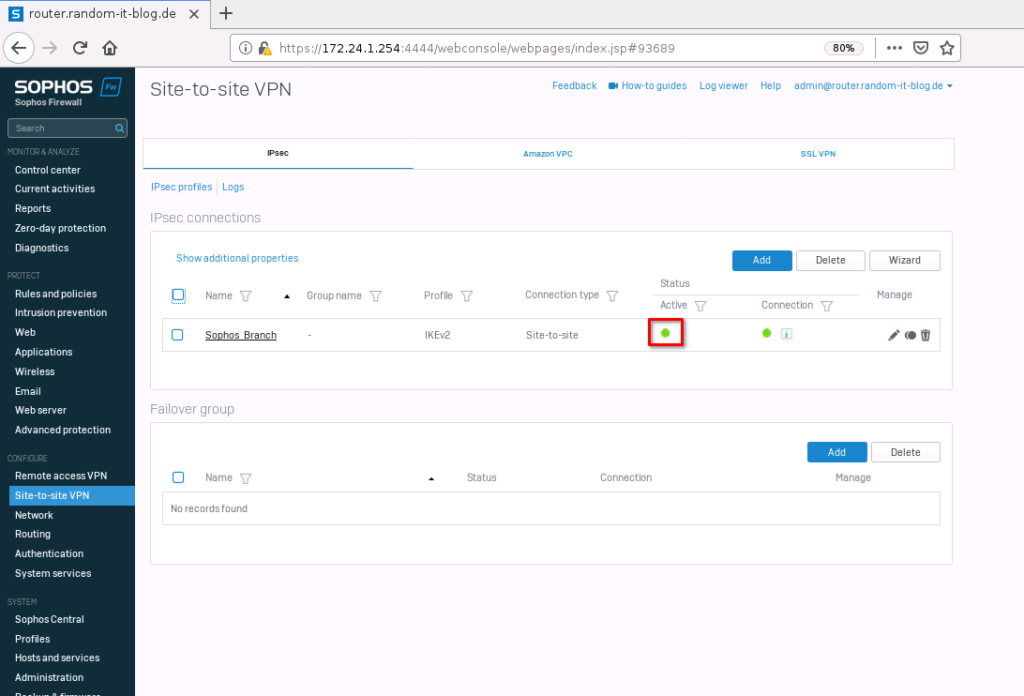
You can always check the logs from the “log viewer” at the top of the page, in case something does not work.
Ok. That’s it for the VPN configuration on the Sophos XGS Firewalls.
This one was a bit longer than usual. Hopefully, it is not too confusing.
See you next time.