Hello there.
So Fedora 35 just came out and I want to install my favourite backup application on it. “Veeam Agent for Linux FREE”. We are using “Veeam Backup & Replication” to backup almost every customers server/client infrastructure. So when they released “Veeam Agent for Linux” a few years ago I had to try it out. And it’s absolutely amazing (The Windows Version is also great, by the way). The only annoyance is, that it tends to break with a lot of new kernel releases.
Anyway, it is still one of the best backup applications out there and I want to show you how to install it on Fedora. I am using Fedora 35 GNOME for this but it’s the same steps for most supported distributions. Except for the installation of course.
(Optional) Installing Kernel 5.13.19-200 in Fedora 35
Update: There is support for those kernels now, so this is not required anymore.
OK, this step is specific to Kernel 5.14 and above… for now. If you still have a Kernel below 5.14 (like I do on my primary system), then you can skip this step. Veeam Agent for Linux does not fully support Kernel 5.14 at the time of writing. File backups work. So if that is all you want, continue.
But for everyone else, this is one way to get it working on Fedora 35. I basically downloaded and installed Kernel 5.13 from koji.fedoraproject.org. Keep in mind that this is absolutely not a good idea since there could be security vulnerabilities in 5.13 that are patched in Kernel 5.14.
But this would allow you to boot with the old kernel to create a backup and restart into the new one after completion.
There is an experimental version of veeamsnap on github, but this did not work for me.
Here is how you can download and install the kernel and all dependencies. Make sure to keep a working kernel in case the system fails to boot with the old kernel.
fedora-kde :: ~ » cd Downloads
fedora-kde :: ~/Downloads » mkdir kernel ; cd kernel
fedora-kde :: ~/Downloads/kernel » wget https://kojipkgs.fedoraproject.org//packages/kernel/5.13.19/200.fc34/x86_64/kernel-5.13.19-200.fc34.x86_64.rpm https://kojipkgs.fedoraproject.org//packages/kernel/5.13.19/200.fc34/x86_64/kernel-core-5.13.19-200.fc34.x86_64.rpm https://kojipkgs.fedoraproject.org//packages/kernel/5.13.19/200.fc34/x86_64/kernel-devel-5.13.19-200.fc34.x86_64.rpm https://kojipkgs.fedoraproject.org//packages/kernel/5.13.19/200.fc34/x86_64/kernel-modules-5.13.19-200.fc34.x86_64.rpm https://kojipkgs.fedoraproject.org//packages/kernel/5.13.19/200.fc34/x86_64/kernel-modules-extra-5.13.19-200.fc34.x86_64.rpm

fedora-kde :: ~/Downloads/kernel » ls -lm1
kernel-5.13.19-200.fc34.x86_64.rpm
kernel-core-5.13.19-200.fc34.x86_64.rpm
kernel-devel-5.13.19-200.fc34.x86_64.rpm
kernel-modules-5.13.19-200.fc34.x86_64.rpm
kernel-modules-extra-5.13.19-200.fc34.x86_64.rpm

fedora-kde :: ~/Downloads/kernel » sudo dnf install *
Getting the Repository for Fedora
First, we need the repository file from the Veeam homepage. You will have to create a free account to be able to download the repository.
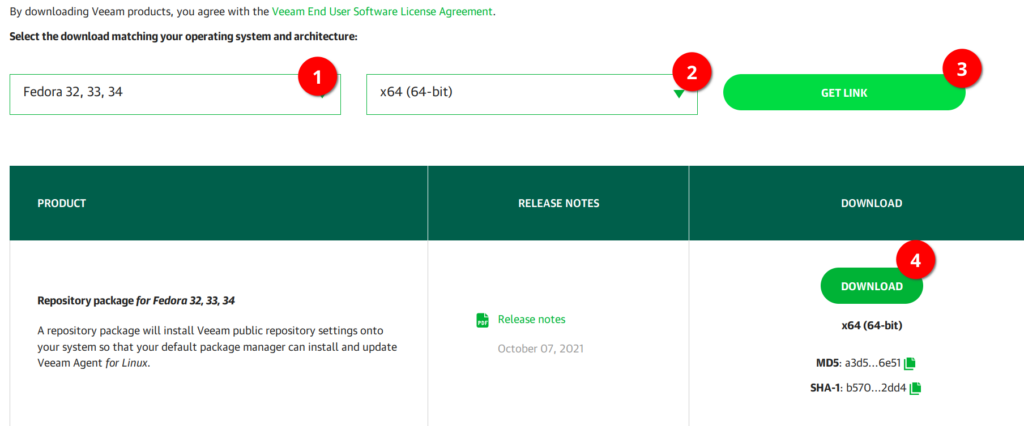
Once you created an account (by clicking on “Download now” and entering your information) you will be redirected to the download page.
Here you can choose the OS (1) and architecture (2). Click on “Get Link” (3) and download the rpm file. The current version of the repository at the time of writing is 1.0.8-1
Installing the Repository and Veeam Agent
Once you have your file you can install it with the “dnf” command. I am assuming that you leave the downloaded file in the “Downloads” folder.
fedora-kde :: ~ » cd ~/Downloads
fedora-kde :: ~/Downloads » sudo dnf install ./veeam-release-fc24-1.0.8-1.x86_64.rpm
Last metadata expiration check: 0:44:08 ago on Thu 11 Nov 2021 06:50:44 PM CET.
Dependencies resolved.
===================================================================================================
 Package                       Architecture      Version             Repository               Size
===================================================================================================
Installing:
 veeam-release-fc24            x86_64            1.0.8-1             @commandline            5.2 k

Transaction Summary
===================================================================================================
Install  1 Package

Total size: 5.2 k
Installed size: 7.2 k
Is this ok [y/N]: y
Now that the repository is installed, we can install “Veeam Agent for Linux”.
This will install a ton of dependencies.
fedora-kde :: ~/Downloads » sudo dnf install veeam -y
You will also need to install “xorriso” and add three lines into the “veeamservice.service” file, for the recovery media ISO creation.
fedora-kde :: ~/Downloads » sudo dnf install xorriso -y
fedora-kde :: ~/Downloads » sudo systemctl edit veeamservice.service
### Editing /etc/systemd/system/veeamservice.service.d/override.conf
### Anything between here and the comment below will become the new contents of the file

[Service]
LimitNOFILE=524288
LimitNOFILESoft=524288


### Lines below this comment will be discarded

### /usr/lib/systemd/system/veeamservice.service
# [Unit]
# Description=Veeam Agent for Linux service daemon
# After=network.target
#
# [Service]
# Environment="PIDFILE=/var/run/veeamservice.pid"
# PIDFile=/var/run/veeamservice.pid
# Type=forking
# ExecStart=/usr/sbin/veeamservice --daemonize --pidfile=${PIDFILE}
# #ExecStop=/sbin/start-stop-daemon --stop --quiet --retry=TERM/30/KILL/5 --pidfile ${PIDFILE} --name veeamservice
# TimeoutStopSec=90
# KillMode=process
# LimitNOFILE=524288
# LimitNOFILESoft=524288
#
# [Install]
# WantedBy=multi-user.target
fedora-kde :: ~/Downloads » sudo systemctl daemon-reload
fedora-kde :: ~/Downloads » sudo systemctl restart veeamservice
Veeam Agent configuration
That is it for the installation. Let’s configure the Veeam Agent.
fedora-kde :: ~ » sudo veeam
You can navigate with TAB or SHIFT + TAB and confirm with SPACEBAR
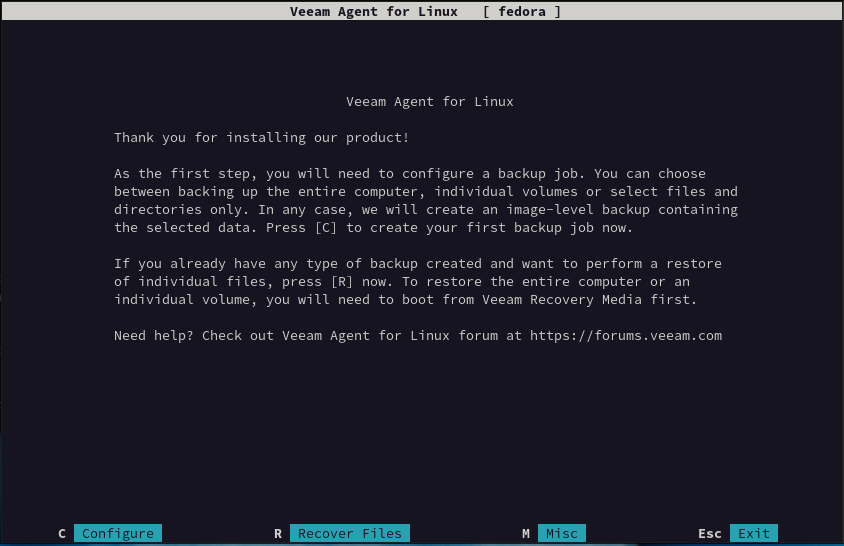
Accept the terms and hit “Next”.

Select “Patch Veeam Recovery Media ISO” and if required “EFI system”. Enter the location to save the ISO. Move the ISO to a location you can get to in case you system fails.

Once the process is done you will be asked to enter the license. If you purchased a license, you can enter it here. If not just choose “Finish”.

This is the main menu. Here you can start your backup manually, create a job and recover files. We do not have a backup job yet, so let’s create one. Click the “C” key on your keyboard to configure your backup.
Choose a name for your backup.

Here you can decide on the type of backup you want. I will backup the entire machine but if you have several disks in your PC and only want to backup your main system you could choose “Volume level backup” or if you want to only backup the home folder select “file level backup”.

Choose your backup repository/location. The Veeam Backup & Replication option is pretty cool. You can centralize your client backups by connecting them with a Veeam Backup & Replication Server (which also exists as a Community Edition). But in this guide, we will choose the “shared folder” option.

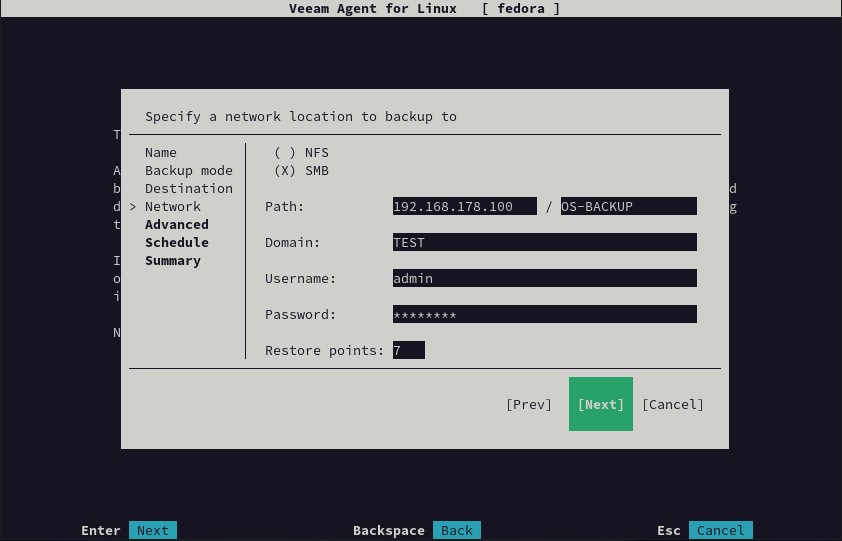
Input the credentials for your shared folder and how many restore points you want.
I have a samba and NFS server in my network but prefer SMB in this case. The “Domain” is optional.
This next step gives you a few more advanced job settings. I will encrypt my backup.


Almost done. Configure the schedule for your backups.

A short summary. Once you verified the settings select “Finish”.

Here is a Screenshot with a couple of failed jobs and the working ones.


That’s it for the backup configuration. Quite simple isn’t it?
Restoring files with the veeam agent.
Restoring files is also very easy. The next few screenshots are from my main system.
In the main menu hit the “R” key for “Recover Files”.

Select the backup you want to restore.

Once you confirm the selection with ENTER the backup will be mounted to /mnt/backup

Now you can browse the backup like any other folder on your system.
Once you’re done, you can unmount the mount with the “U” key.
Bare-metal Restore
So what if your system completely fails to boot, for whatever reason? How do we get our system back?
Earlier we created a Recovery ISO. We will create a bootable flash drive and boot from it to do a full restore of our system.
Make sure to backup any files on that flash drive, because it will be wiped. Also, be very careful with the next step. If you choose the wrong disk you could potentially wipe your system by accident.
Identify your flash drive. Mine is “sde“.
fedora-kde :: ~ » lsblk
NAME                MAJ:MIN RM   SIZE RO TYPE MOUNTPOINTS
loop0                 7:0    0 379.8G  0 loop
loop1                 7:1    0  15.7G  0 loop
loop2                 7:2    0    50G  0 loop
loop3                 7:3    0   600M  0 loop
loop4                 7:4    0     1G  0 loop
loop5                 7:5    0 445.5G  0 loop
sda                   8:0    0 232.9G  0 disk
└─sda1                8:1    0 232.9G  0 part
sdb                   8:16   0 465.8G  0 disk
├─sdb1                8:17   0   300M  0 part
├─sdb2                8:18   0   200M  0 part
├─sdb3                8:19   0   100M  0 part
├─sdb4                8:20   0   128M  0 part
├─sdb5                8:21   0 464.3G  0 part
└─sdb6                8:22   0   541M  0 part
sdc                   8:32   0 232.9G  0 disk /mnt/SSD
sdd                   8:48   0 447.1G  0 disk
├─sdd1                8:49   0   600M  0 part /boot/efi
├─sdd2                8:50   0     1G  0 part /boot
└─sdd3                8:51   0 445.5G  0 part
  ├─fedora_kde-root 253:0    0    50G  0 lvm  /
  ├─fedora_kde-swap 253:1    0  15.7G  0 lvm  [SWAP]
  └─fedora_kde-home 253:2    0 379.8G  0 lvm  /home
sde                   8:64   1  14.5G  0 disk
└─sde1                8:65   1  14.5G  0 part
sr0                  11:0    1  1024M  0 rom
zram0               252:0    0     8G  0 disk [SWAP]
Again, this command is destructive and will not verify anything. Make sure you have selected the correct disk.
fedora-kde :: ~ » sudo dd if=/home/$USER/Downloads/veeam-recovery-amd64-5.0.0.iso of=/dev/sde bs=2k
Once that’s done, you can restart your system and boot from the flash drive. I will be using a virtual machine to demonstrate.

In the next step, you can either wait for it to start the ssh server or just proceed if you have a keyboard attached. I will proceed.

Accept all the terms.

Now we are on the main menu of the “Veeam Recovery Media ISO”. Here we can restore the whole volume or single files. I choose “Restore Volumes”.

Add a shared folder.

Enter your information.

Select you backup you want to restore.

Next, we see the backup volumes on the right and our current system on the left. Select the volume you want to restore to, I will select the whole vda disk.

Here you can choose what you want to do with the selected volume. I choose “Restore from…”

Now select the whole disk from the backup, click “S” on your keyboard for “start restore” and the restore should begin. Make sure that the disk you want to restore to, is identical to or larger than your backup or you will get an error message.

Conclusion
I think Veeam has created one of the best backup applications for Linux. Be it for bare-metal restore or just to recover a file that was accidentally deleted. It has options for almost every need. We have been using Veeam for years now and I was (almost) never disappointed with their software.
But there are a few things that do get annoying. Especially the kernel situation. I don’t know the reason for it getting bricked so often, there is probably a very good one but it doesn’t change the fact.
Another “problem” that you might have with this solution is, that it’s not completely open source, as far as I am aware. This does not bother me too much in this case, but I can understand if this is a no go for people. I myself use only open source applications where possible.
And there are other fantastic backup applications out there. One I am using myself for my server and VMs is “borg”/”borgbackup”. It’s lightweight, easily scriptable and very stable. I never had an issue with it so far. But I don’t think there is an (easy) way for bare-metal recovery on physical devices.
Another one that might interest you is “Relax-and-Recover”. I never used it myself but wanted to try it out for a while now. Its focus is base-metal recovery so no file-level backups. The main purpose is disaster recovery.
Anyway, Veeam, fantastic application. Take a look yourself.